
Table of Contents
- Overview
- Requirements
- Optional Features to Use with Enhanced Checkout
- Setup
- ShipperHQ Dashboard
- Enabling Enhanced Checkout in Shopify
- Shop Pay Configuration
- Additional Features to Use with Enhanced Checkout
- Calendar Display for Carriers
- In-store Pickup Settings
- Enabling Support for Shopify Multi-Origin Inventory
- Split Shipping at Checkout
- Shipping Insights Order Metafield
- Additional Information
- LTL Freight Accessorials
- Unique SKUs Required
- Sales Taxes
- Line Item and Order Hidden Properties
- Shopify Checkout Themes
Overview
Enhanced Checkout empowers you to offer a customizable and engaging buying experience by giving full control over your shipping strategy and checkout. This feature enriches the shopping journey with visually appealing options that surpass a simple list of shipping methods. 😊
With Enhanced Checkout on Shopify, you can:
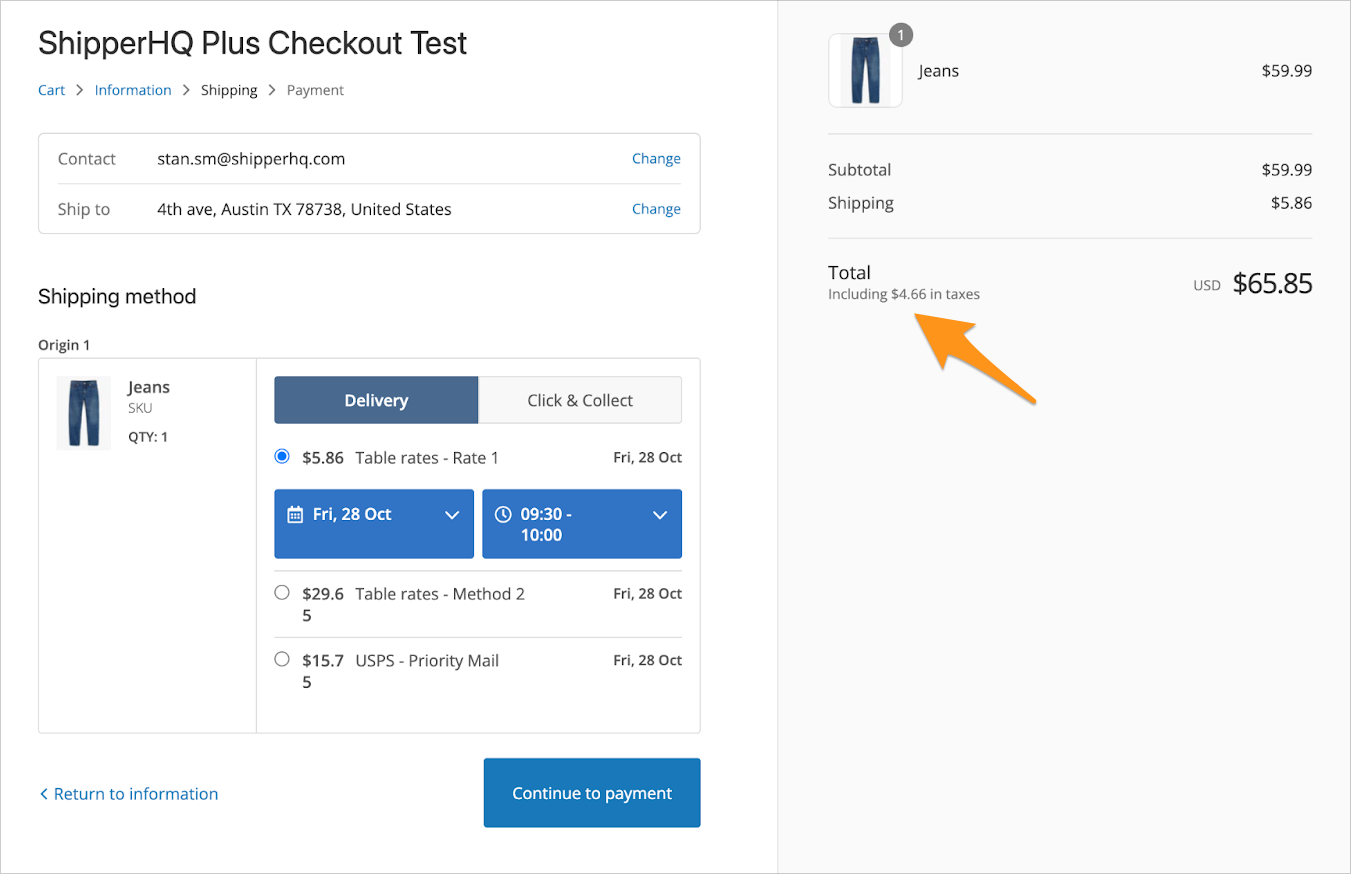
- Show delivery dates for each shipping method
- Allow users to select their delivery date from the calendar view
- Enable in-store pickup location selection with a map view
- Offer pickup time selection
Requirements
- Your store must be on Shopify Plus
- You must have an active ShipperHQ Enterprise plan
- The Enhanced Checkout and Shipping Insights features must be enabled in ShipperHQ
- All products and variants in your Shopify store must have a unique SKU set in Shopify's SKU field
Optional Features to Use with Enhanced Checkout
- Delivery Date & Time for calendar support
- In-store Pick-up with time slots for pickup scheduling
- Show in Calendar for supported live-rate carriers and/or In-store Pick-up
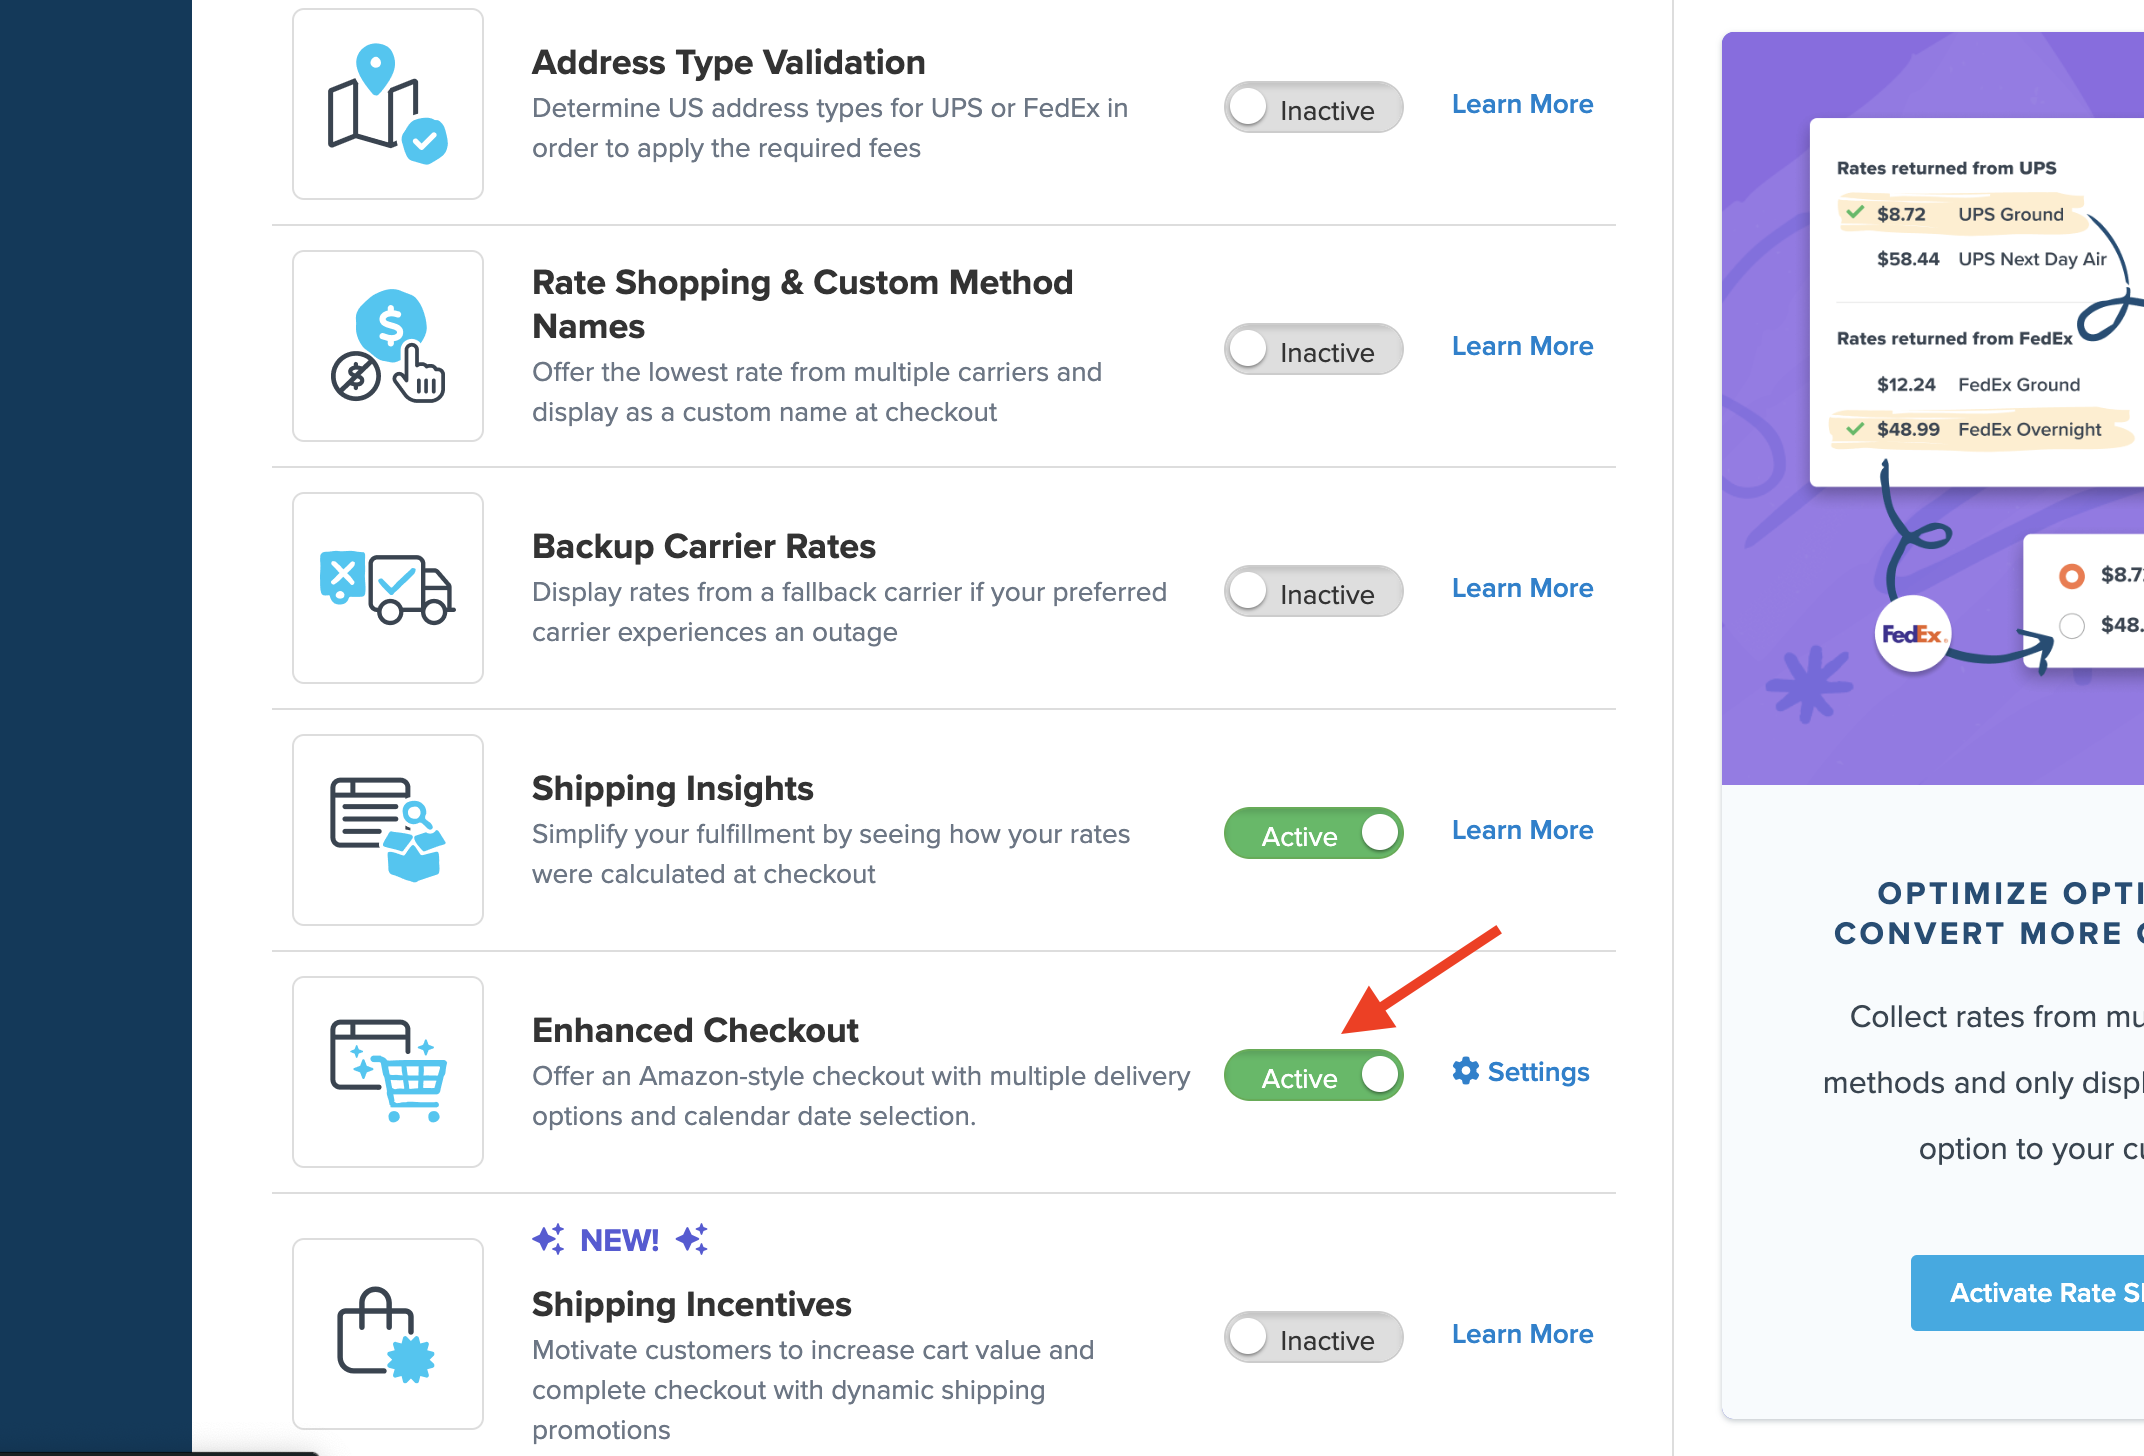
Enabling Enhanced Checkout will automatically enable Shipping Insights if not already active. Note that this will count as two features if your ShipperHQ plan limits the number of advanced features you can enable.
Setup
ShipperHQ Dashboard
- In the ShipperHQ dashboard, choose Advanced Features in the navigation menu and enable the Enhanced Checkout feature.
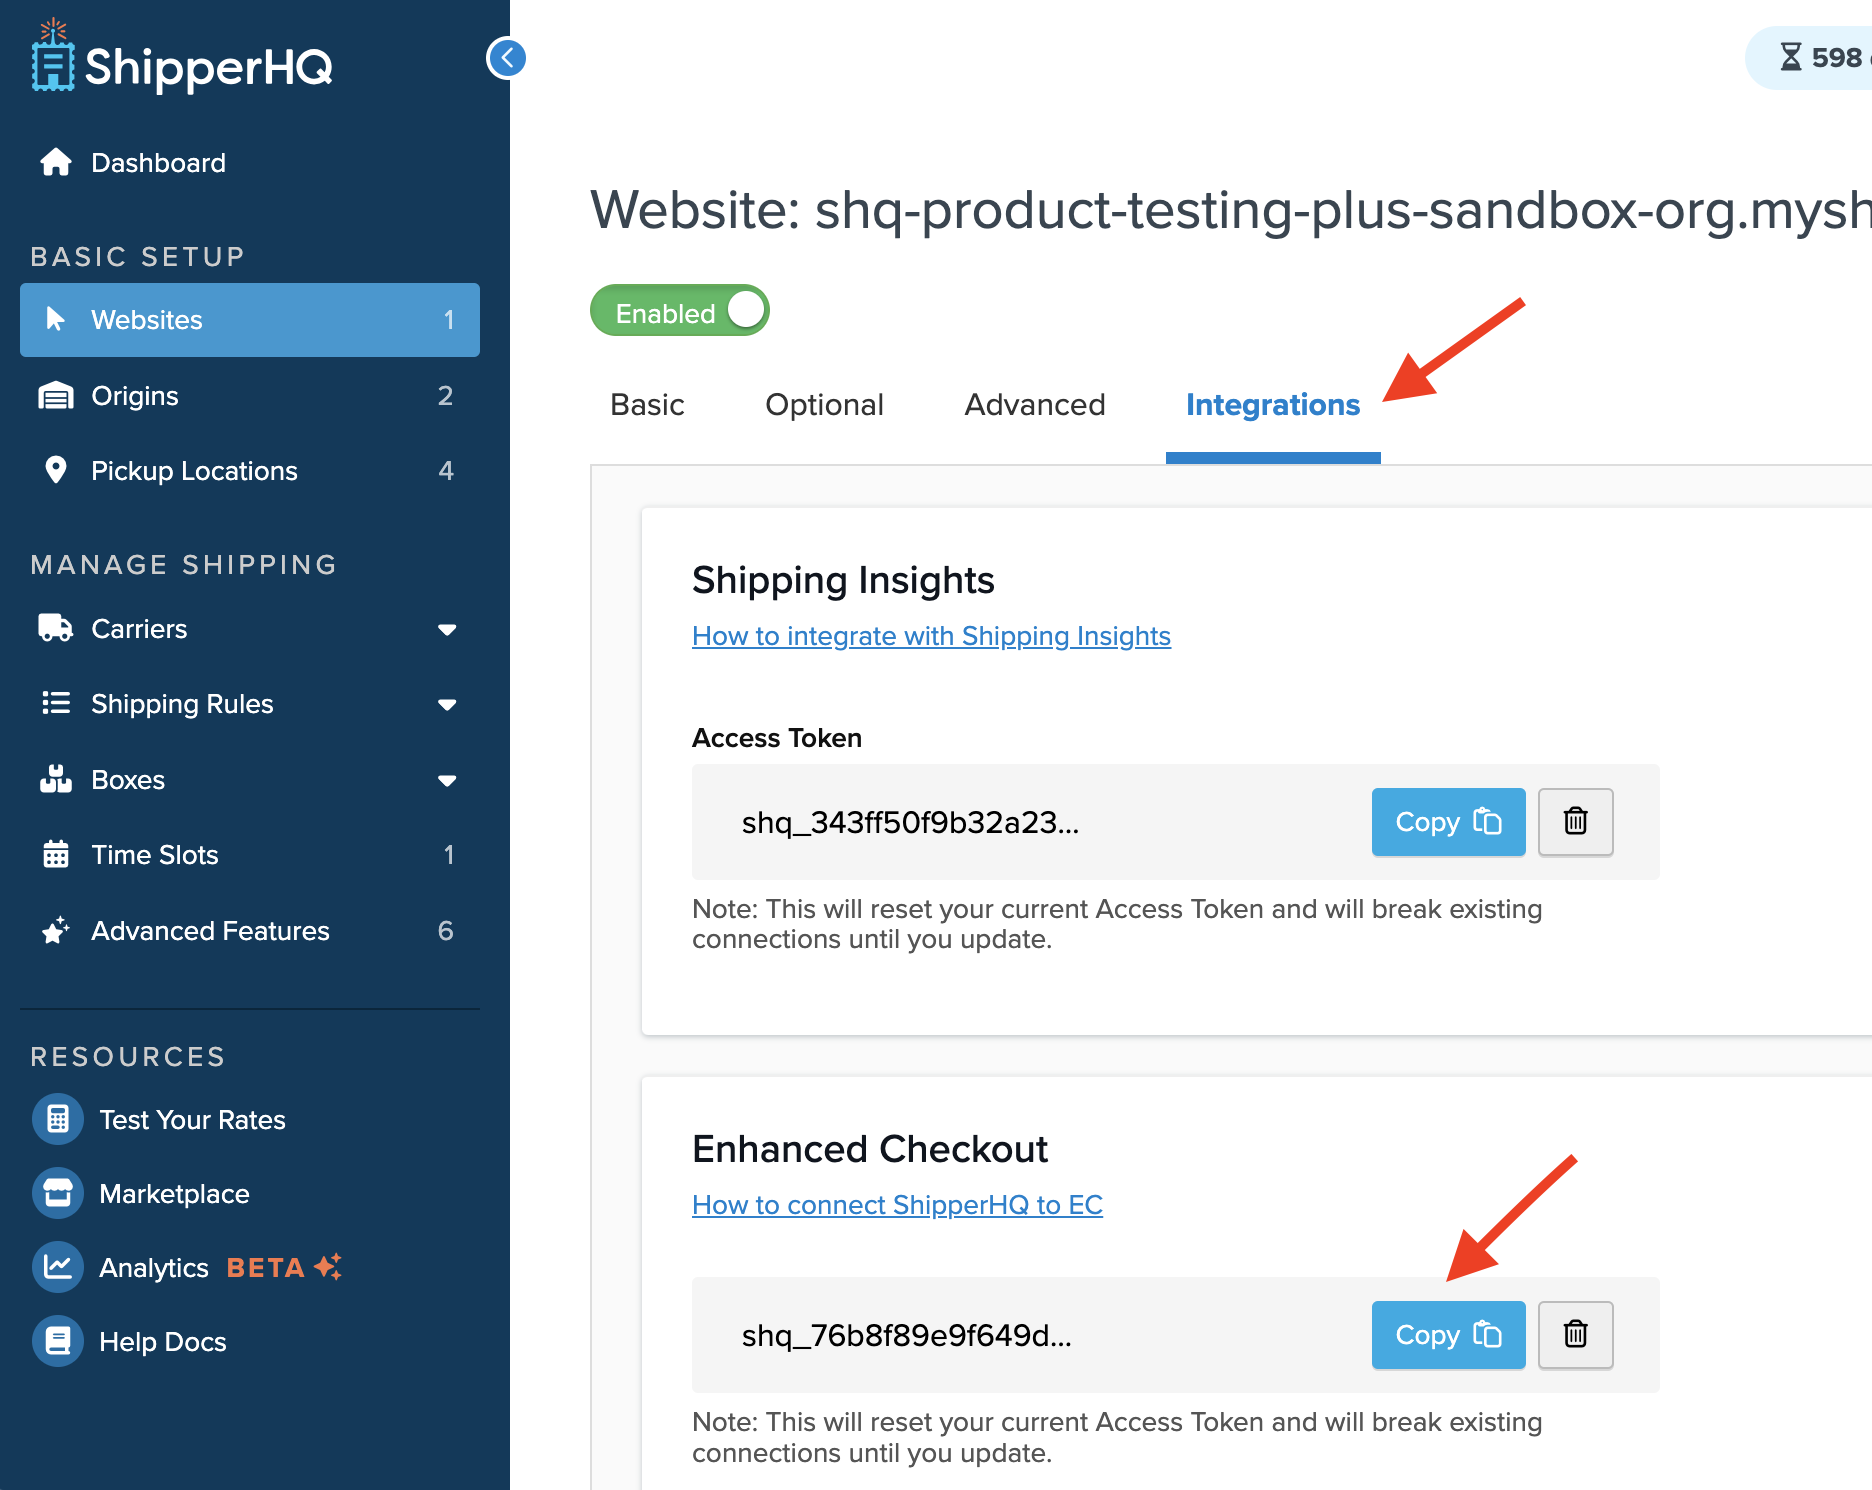
- Navigate to Websites and select your website to access credentials for Enhanced Checkout on Shopify Plus.
- Click the Integrations tab at the top of the website page and copy the access token found under Enhanced Checkout.
💡 Keep the ShipperHQ dashboard open while switching back to your Shopify Plus store dashboard to paste the access token.
- After completing the above steps, return to your Shopify Plus store dashboard to apply the settings below.
Enabling Enhanced Checkout in Shopify
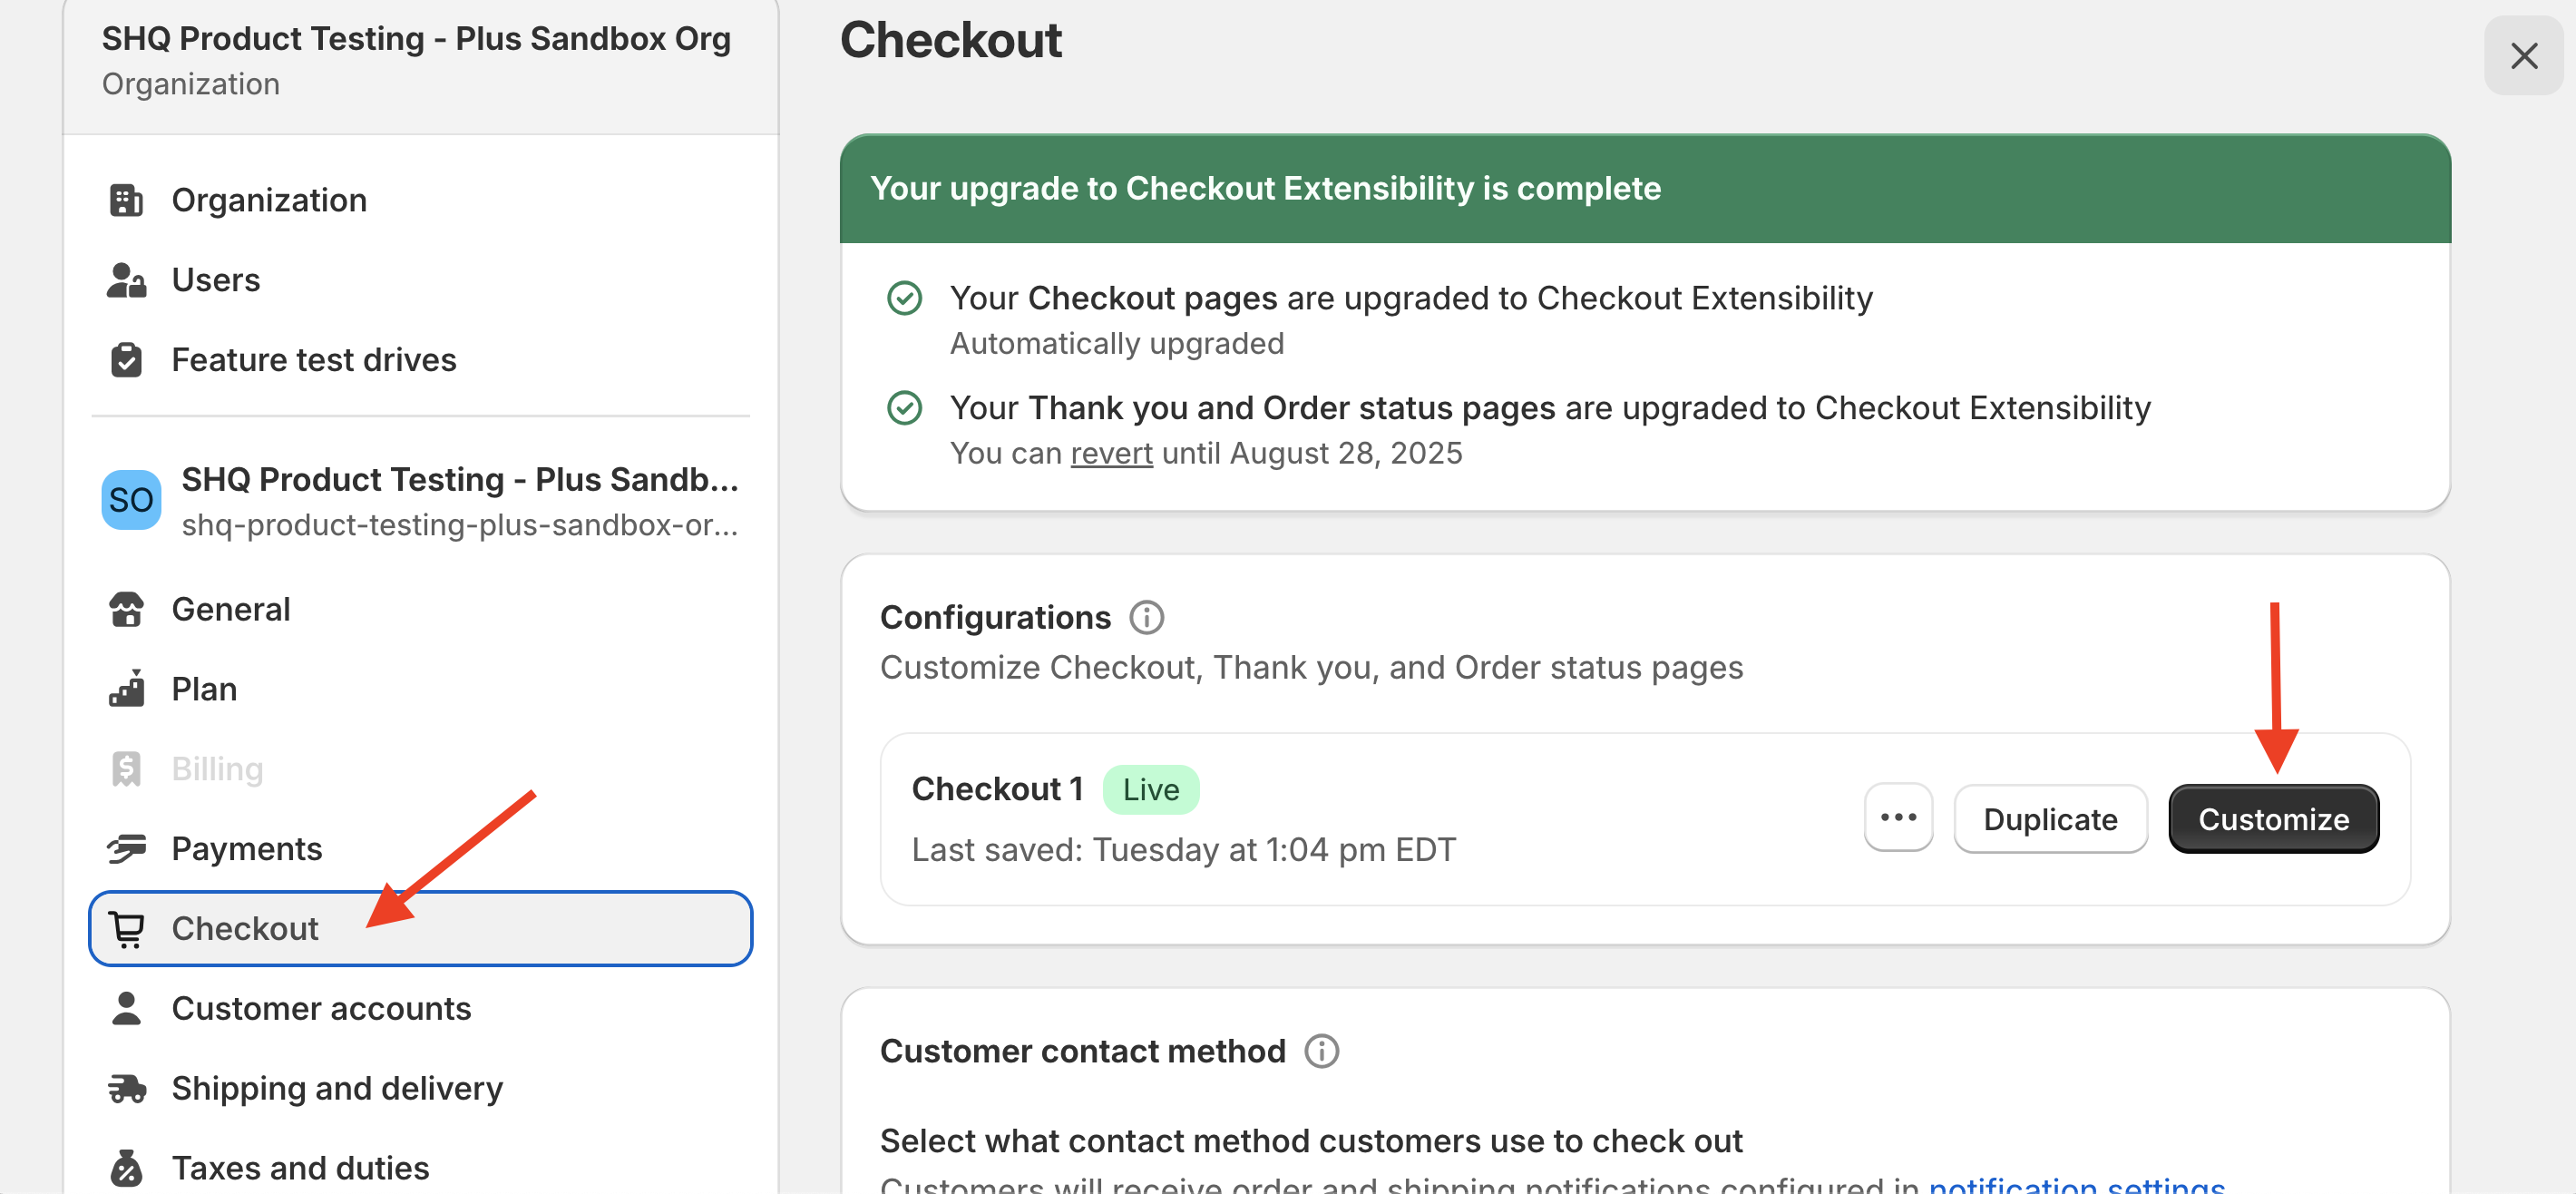
- From your Shopify admin, go to Settings > Checkout.
- Click Customize to add relevant Shopify app blocks for Enhanced Checkout.
- Add the Enhanced Checkout Init app block under the Information section.

- Use the drop-down menu at the top of the page to switch from Information to Shipping.
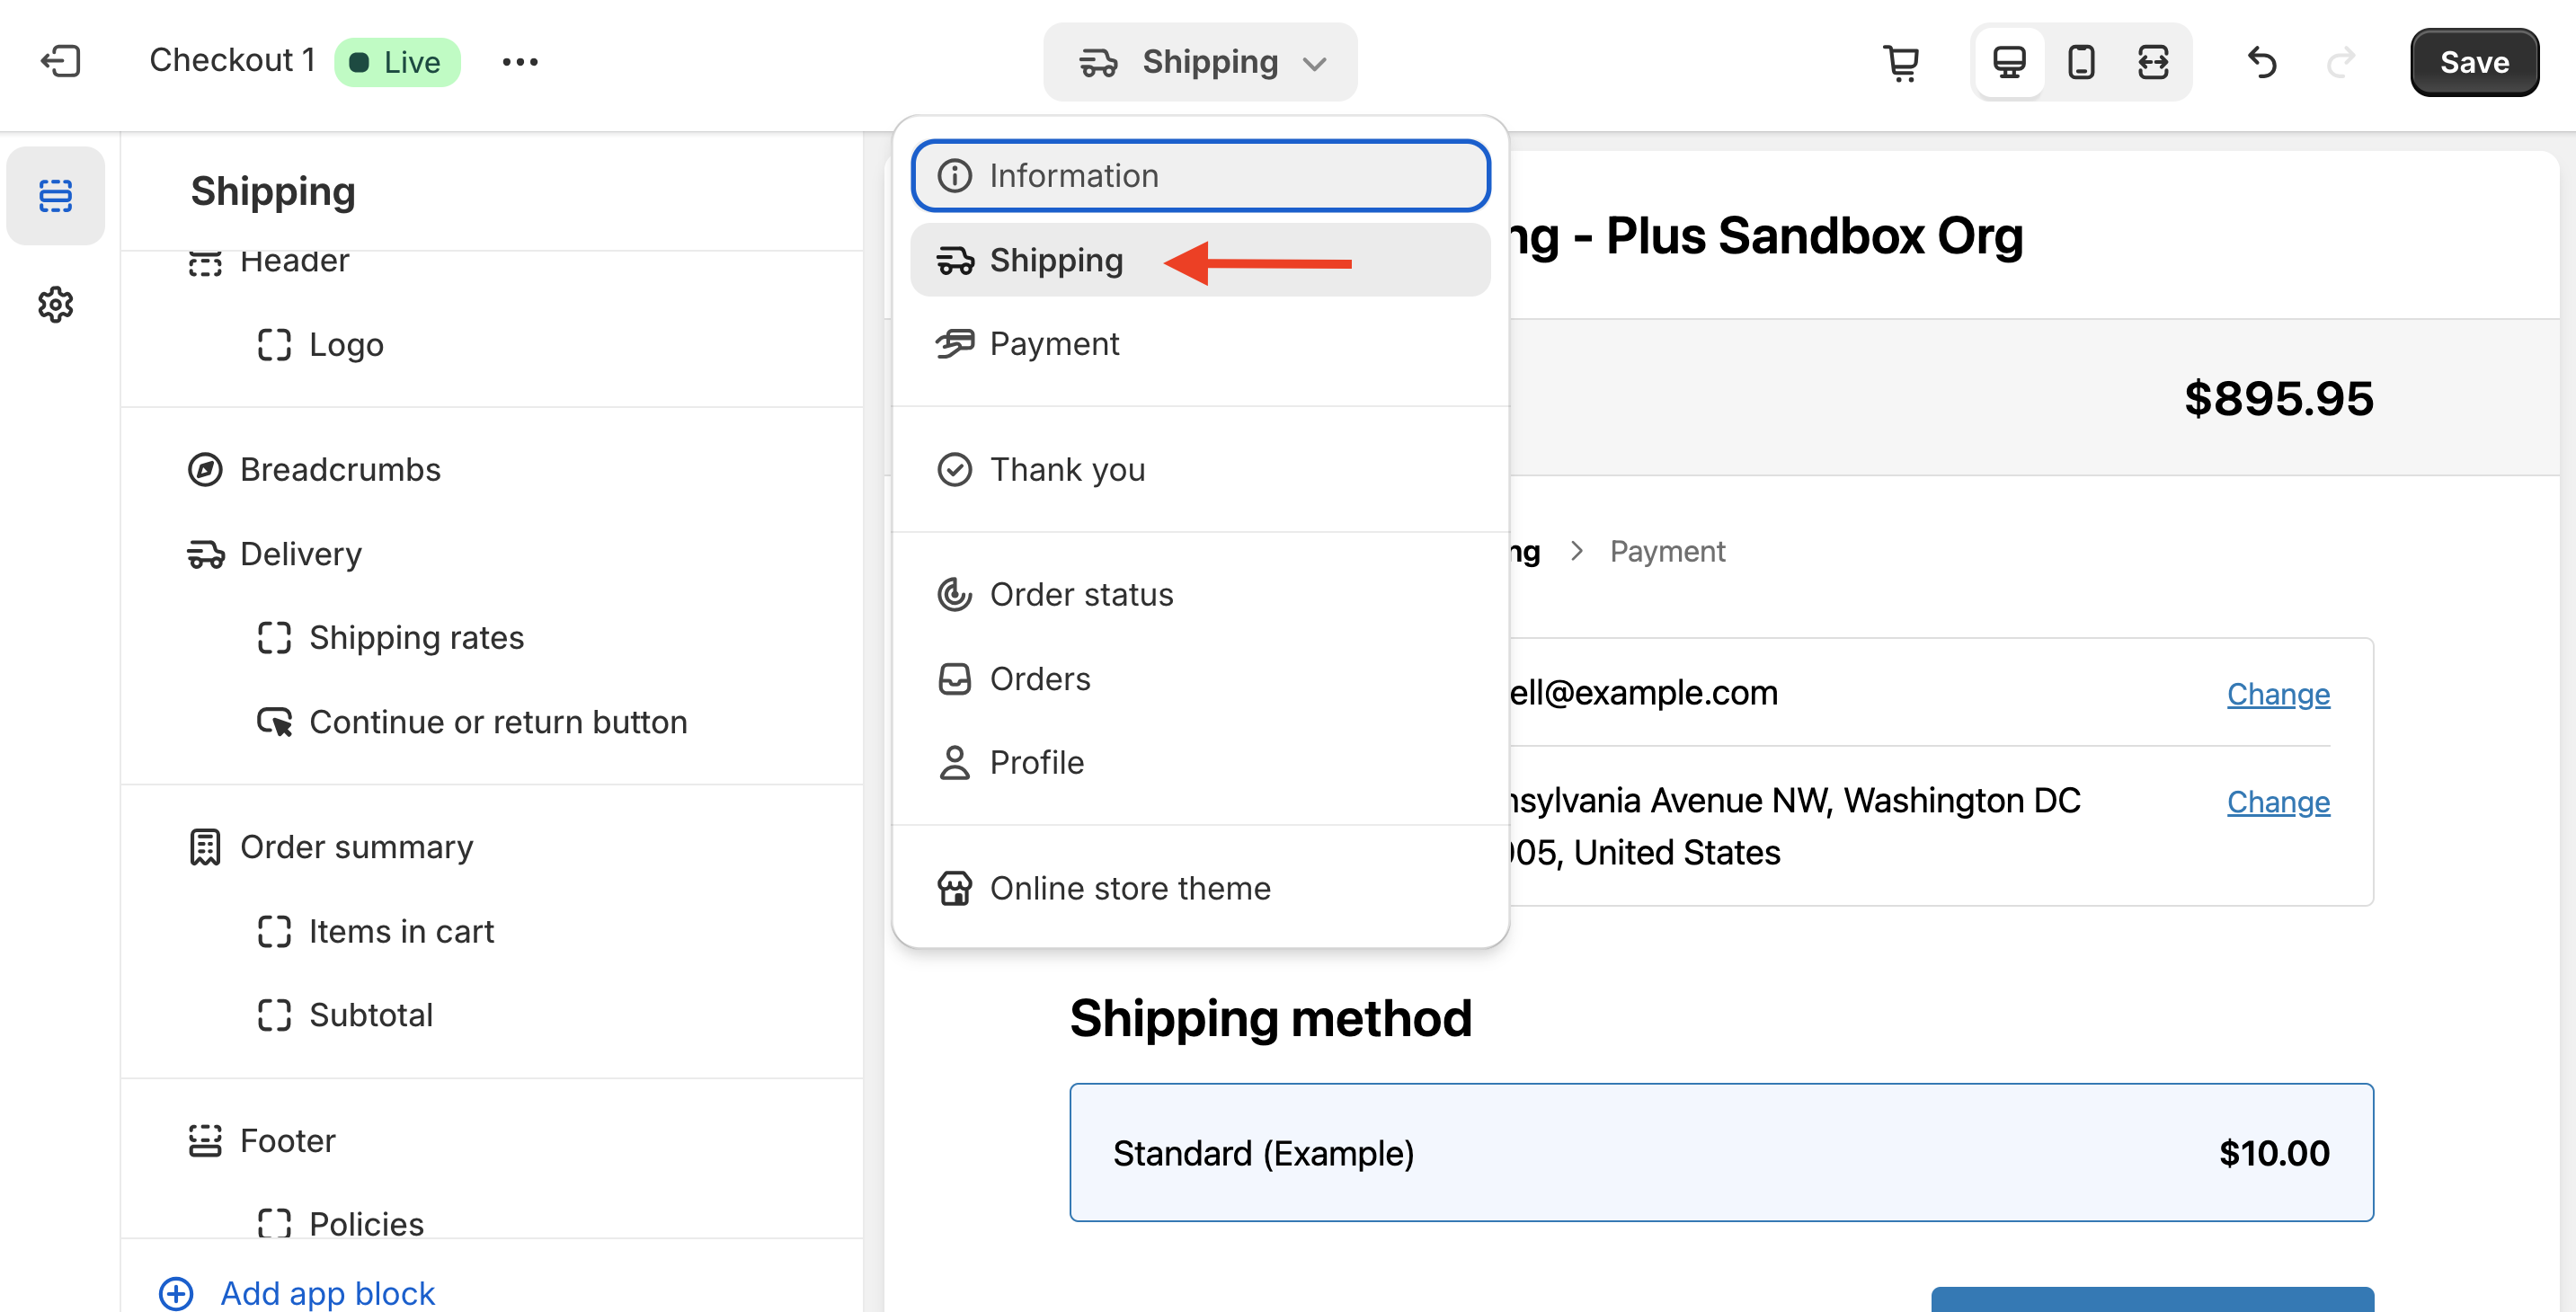
- Click “Add app block” in the lower-left corner to view available checkout blocks for ShipperHQ.
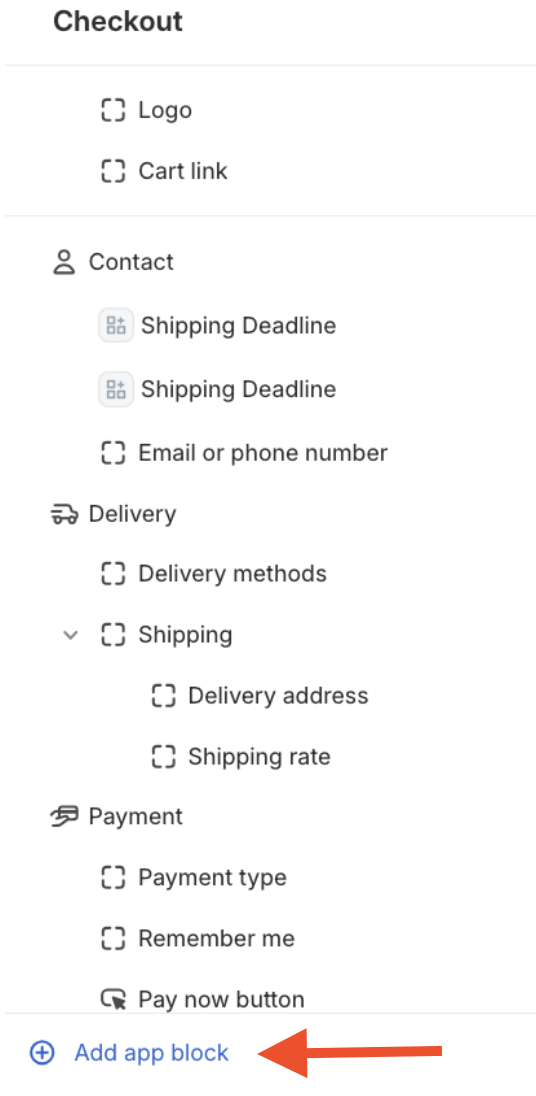
- Locate and add the Enhanced Checkout v2 app block from the menu.
- Paste the ShipperHQ authorization token into the Access Token field.
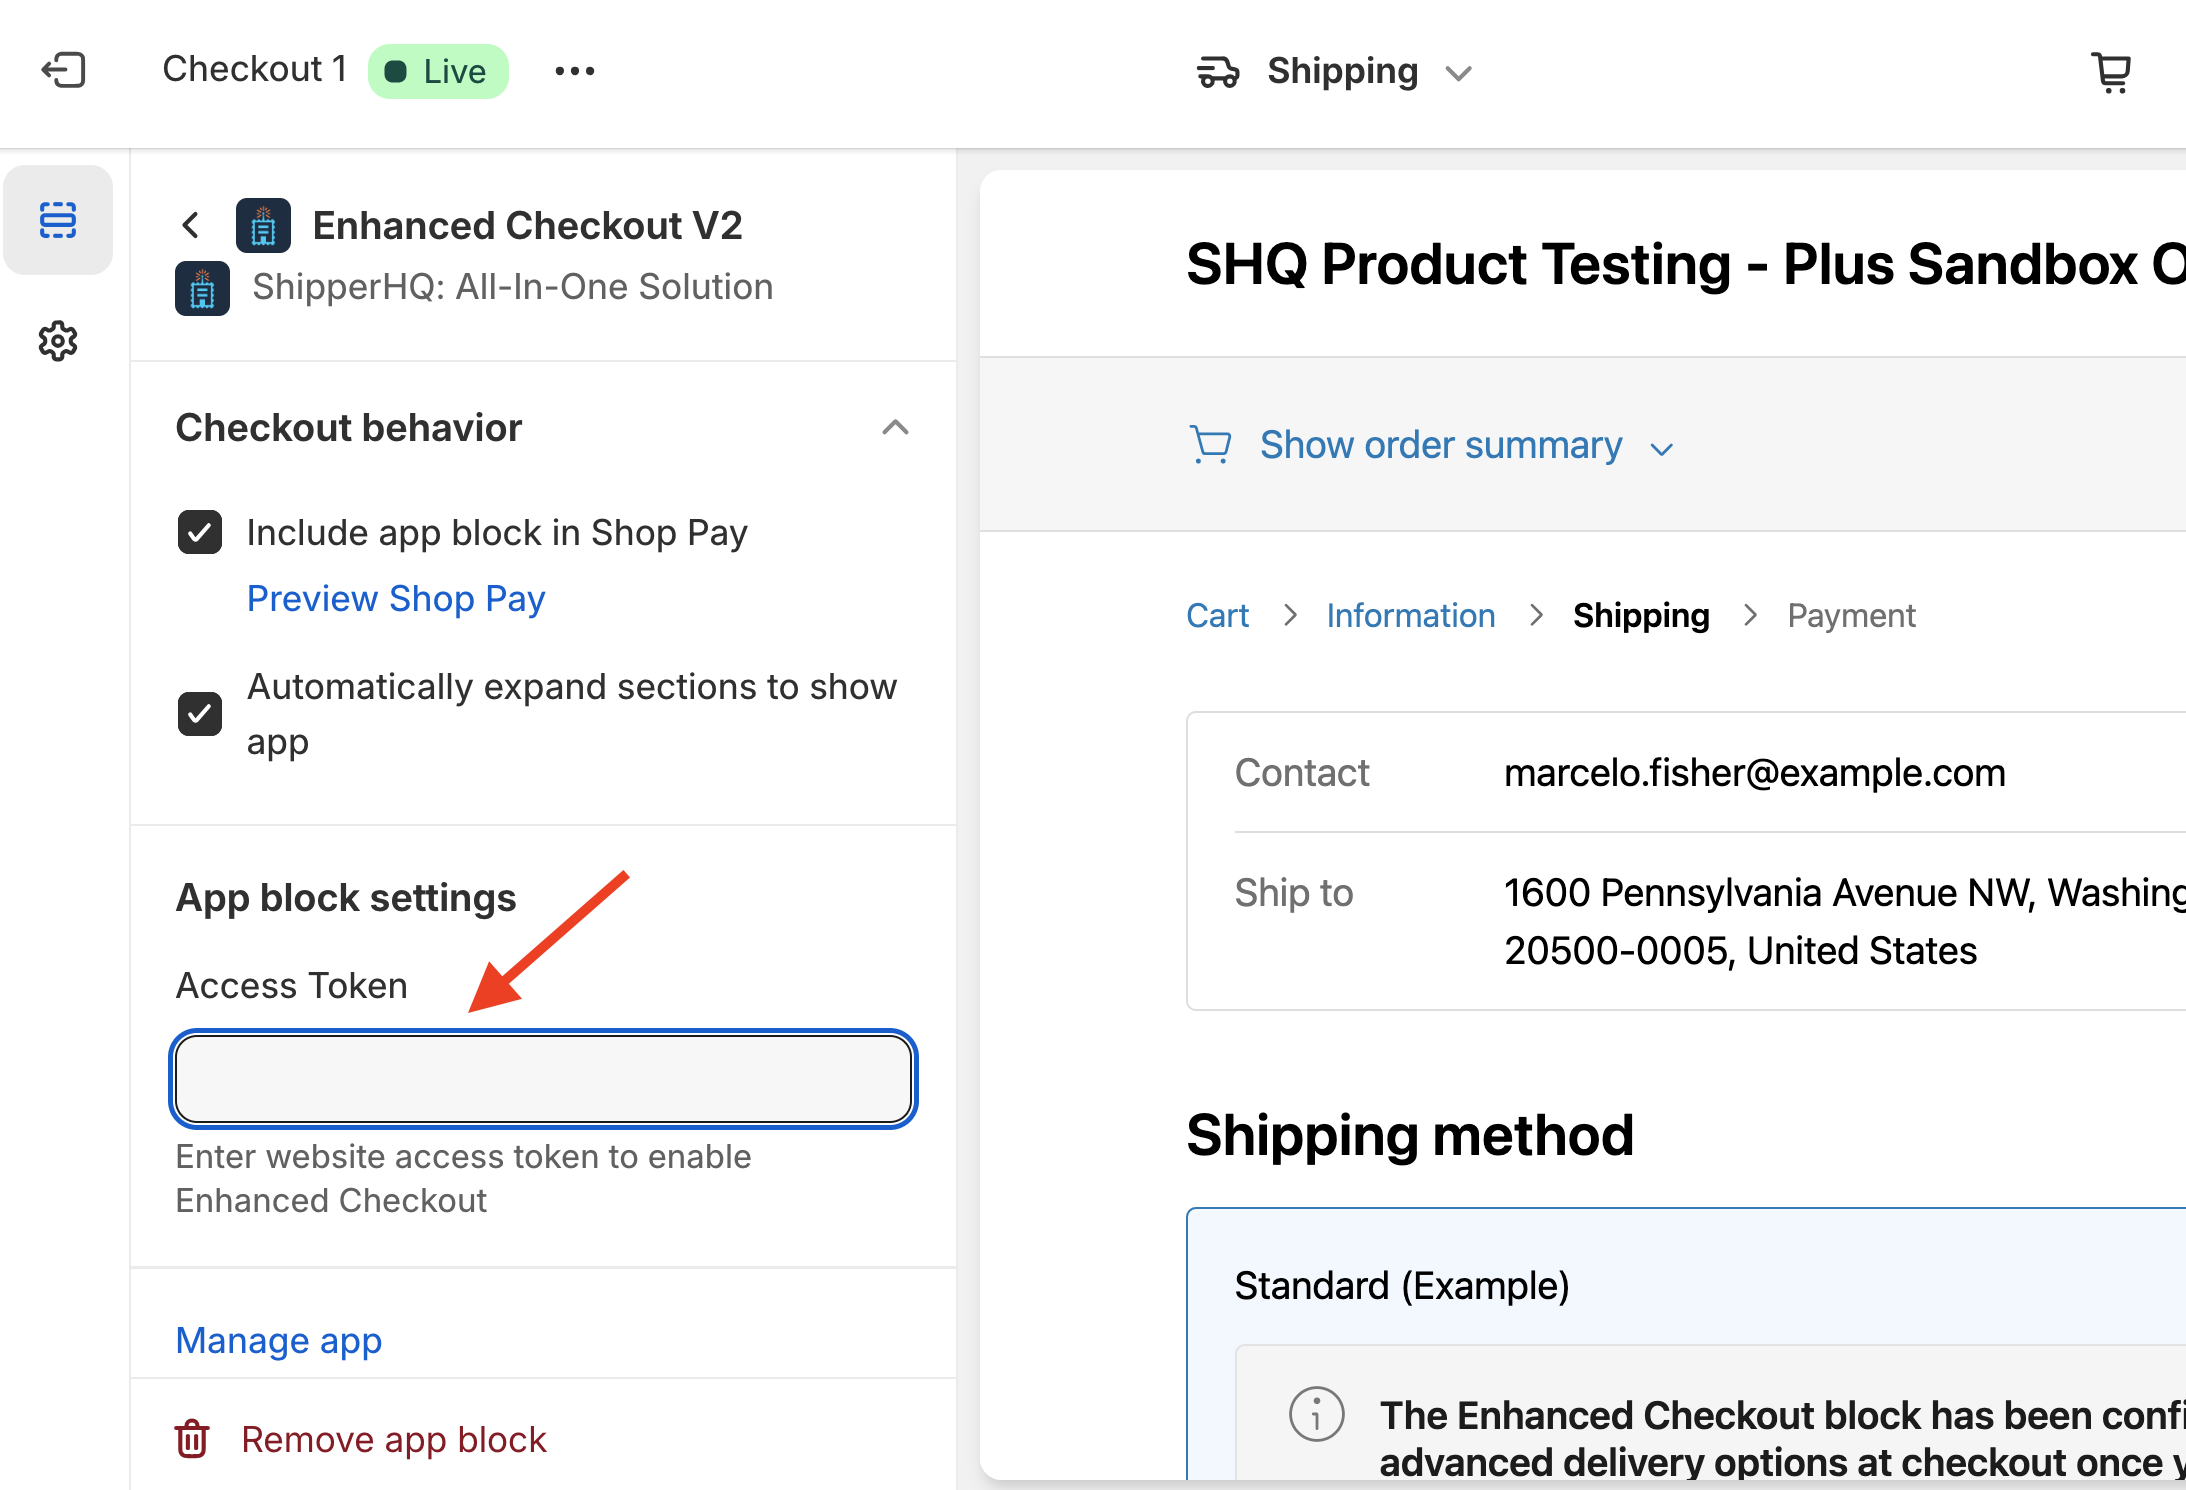
- Check both Include app block in Shop Pay and Automatically expand sections to show app if you plan to use Enhanced Checkout with Shop Pay express checkout.
- Optional: Repeat these steps to add the Shipping Insights App Block if you want delivery date or pickup information on the Order Status Page. (No Access Token required)
- Save your Checkout customization in Shopify.
Shop Pay Configuration
Enhanced Checkout is compatible with Shopify's standard and Shop Pay express checkout. Both the Include app block in Shop Pay and Automatically expand sections to show app checkboxes need to be checked for functionality in Shop Pay.

Additional Features to Use with Enhanced Checkout
Calendar Display for Carriers
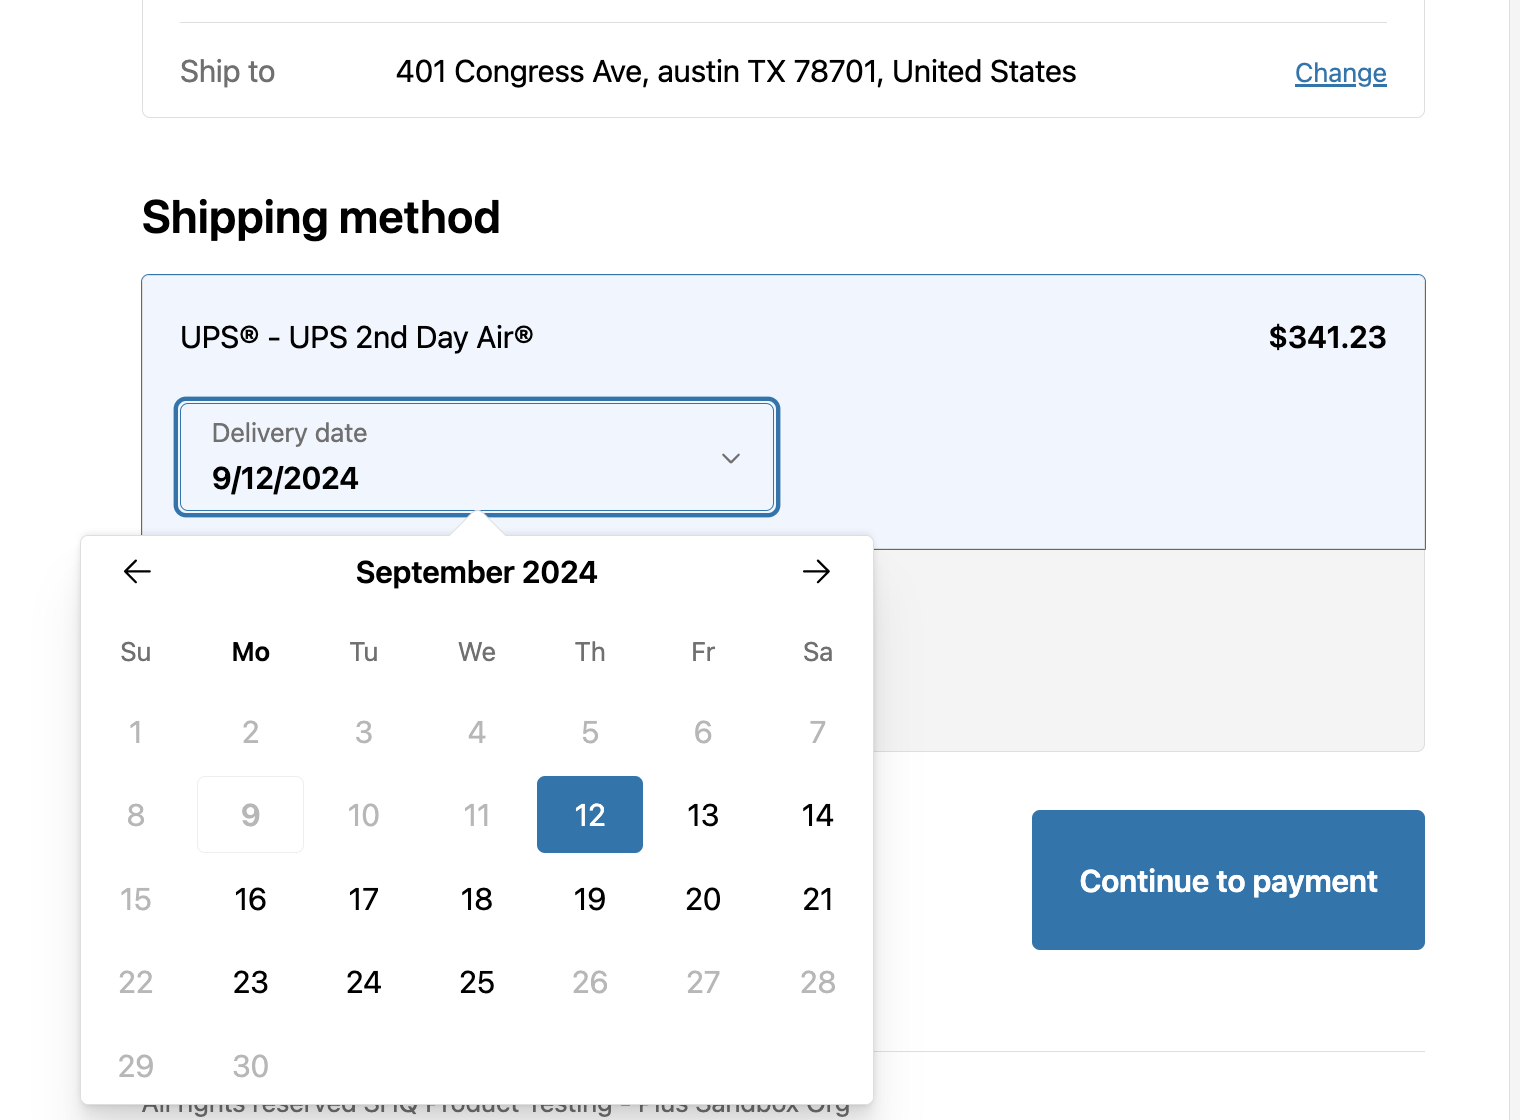
To use the Enhanced Checkout calendar feature, ensure the Delivery Date & Time feature is enabled, and activate the Calendar on each carrier where customers should choose their delivery date.
- In the ShipperHQ dashboard, go to Carriers in the navigation menu.
- Select the Date & Time tab to allow checking out using calendar view rates.
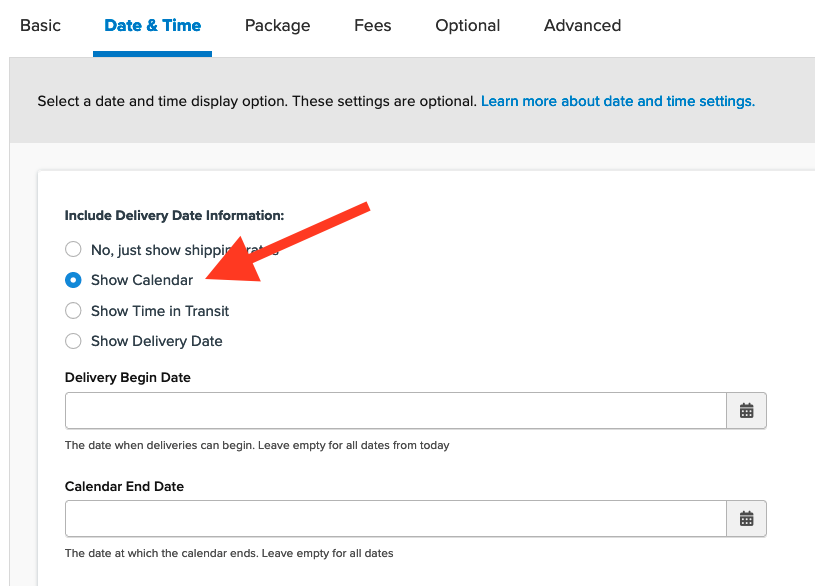
Once saved, checkout options will be organized by date at checkout.
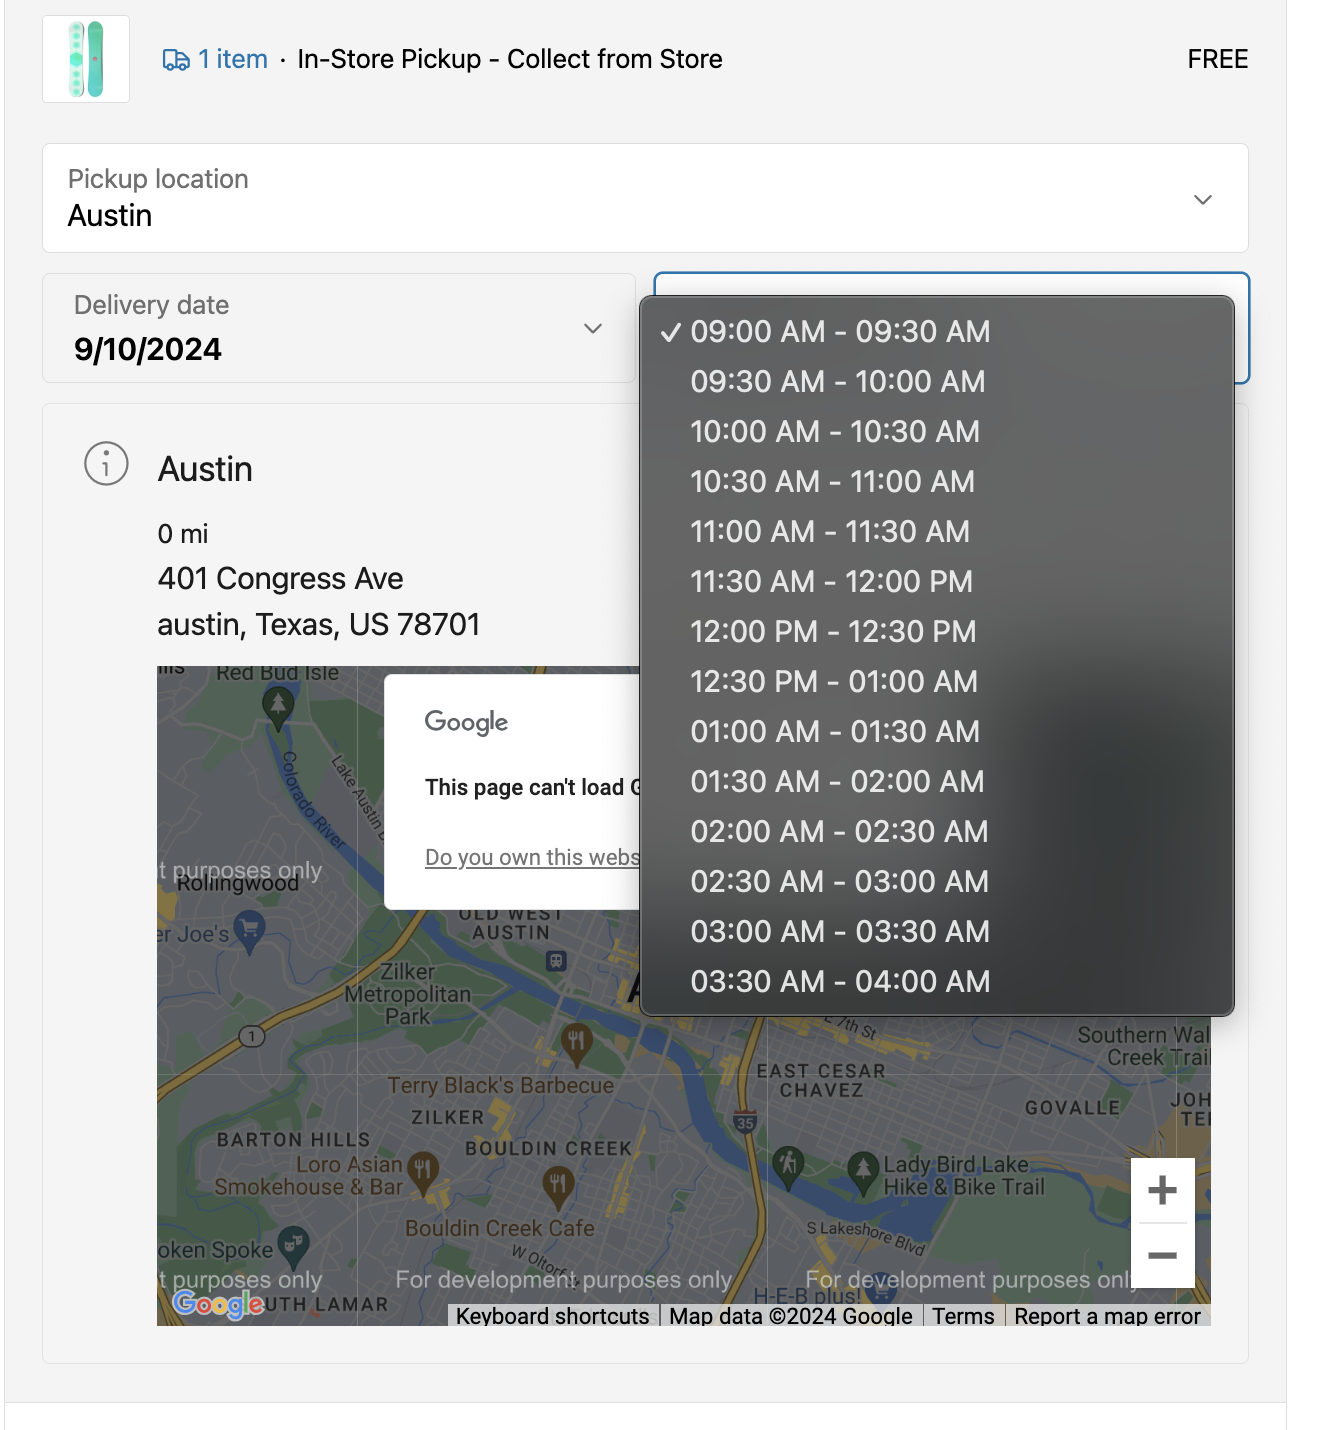
In-store Pickup Settings
Beyond carrier-level In-store Pickup settings, scheduling pickup time slots is another optional but handy feature.
To add time slots:
- Follow carrier-level steps above.
- Locate the Time Slots link in your ShipperHQ Dashboard.
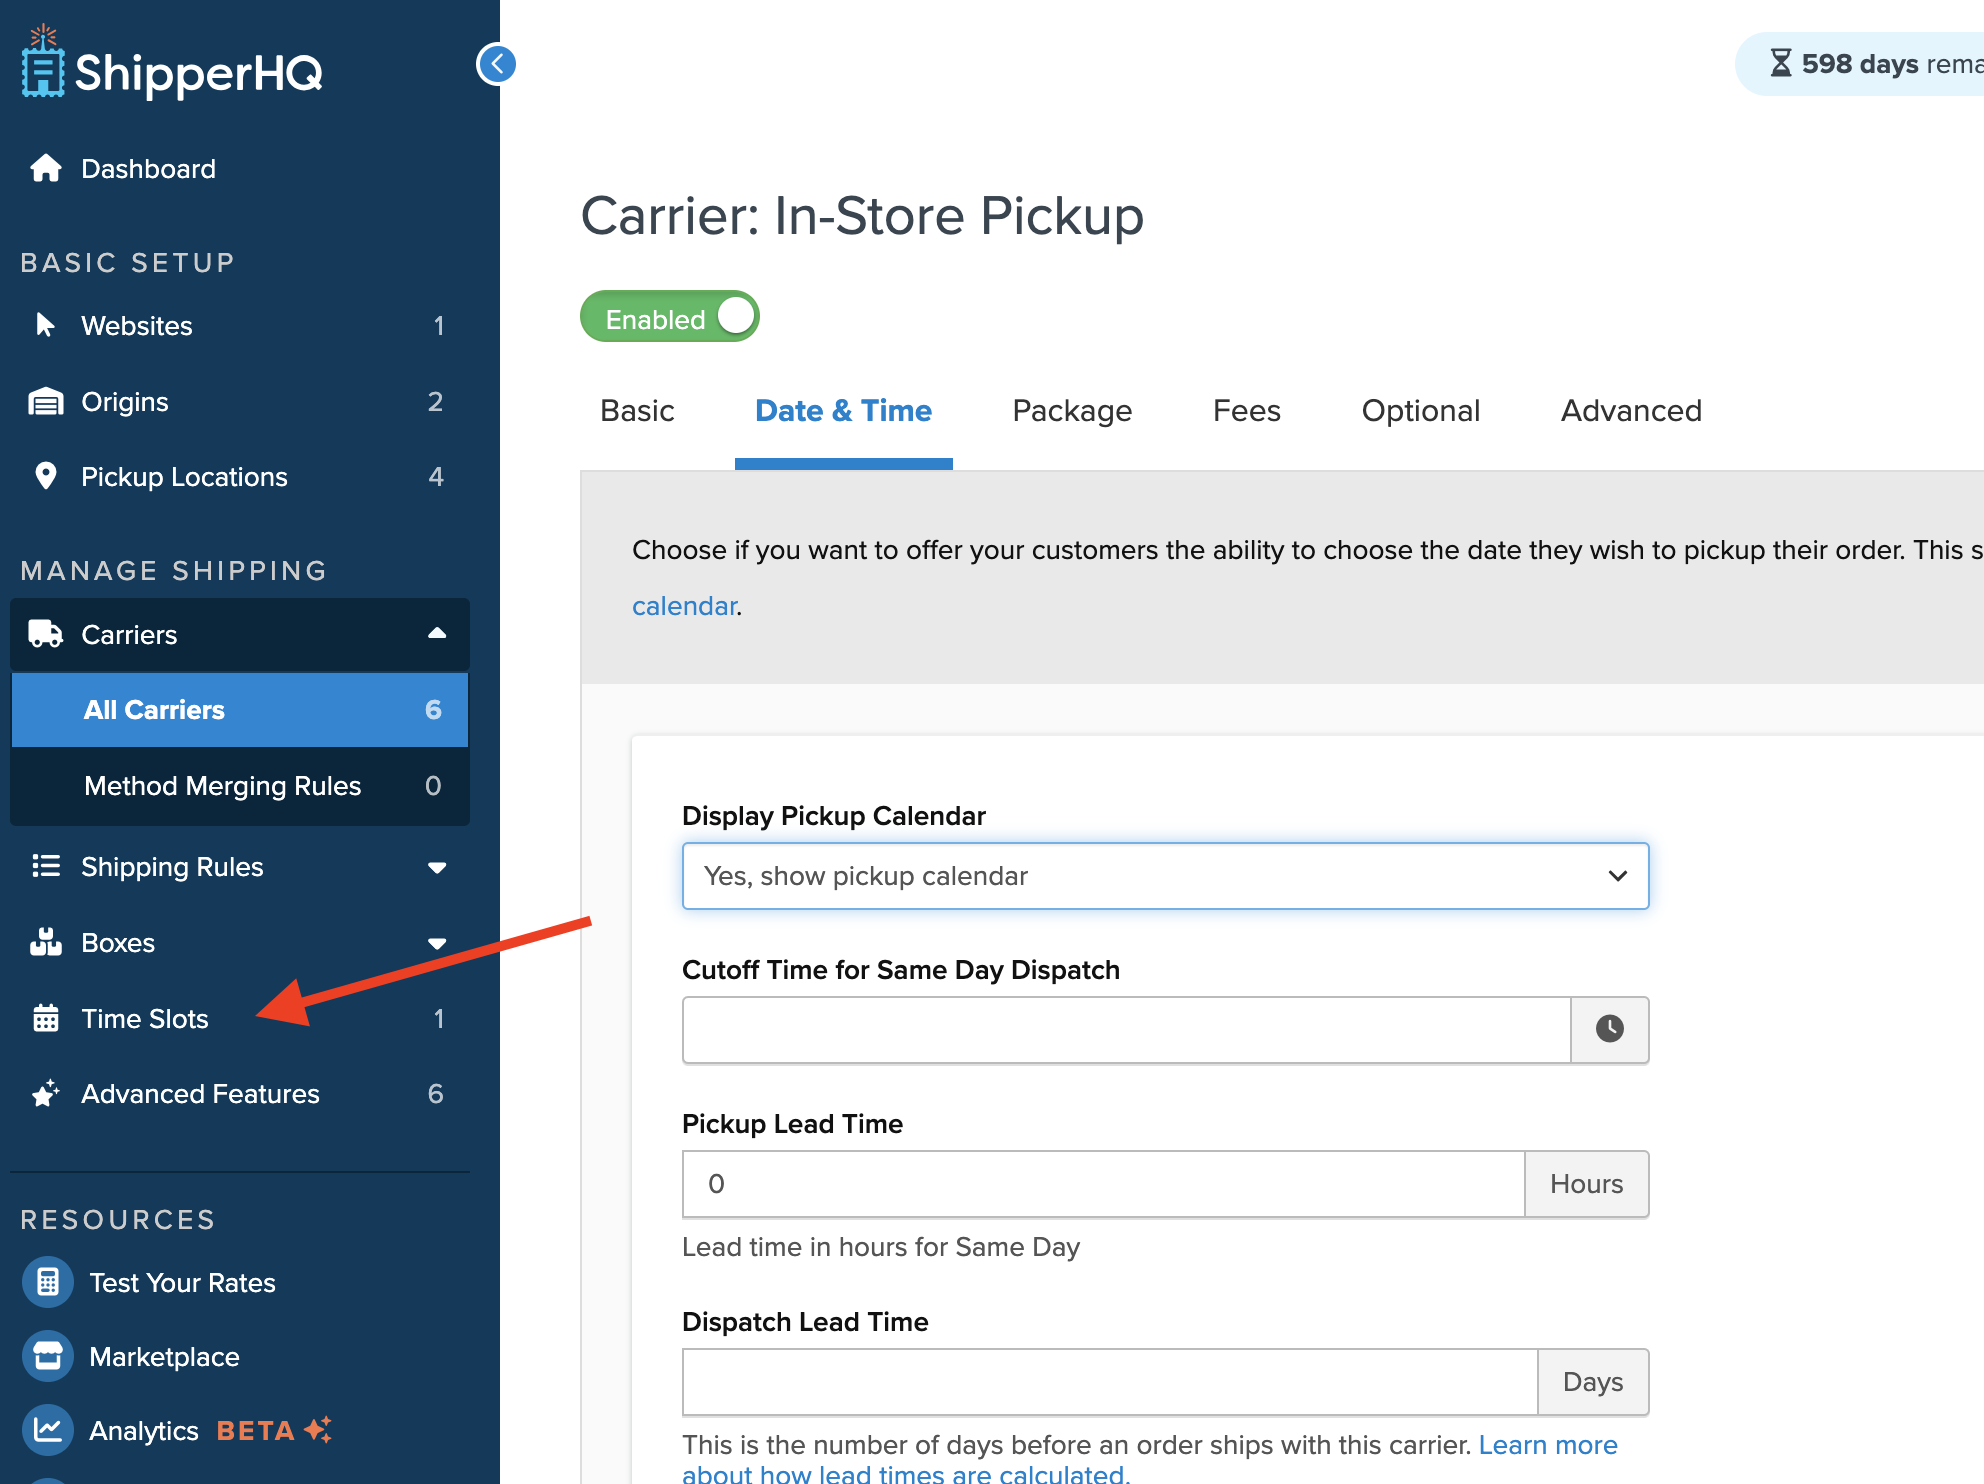
- Configure pickup times within Time Slots settings for checkout display.
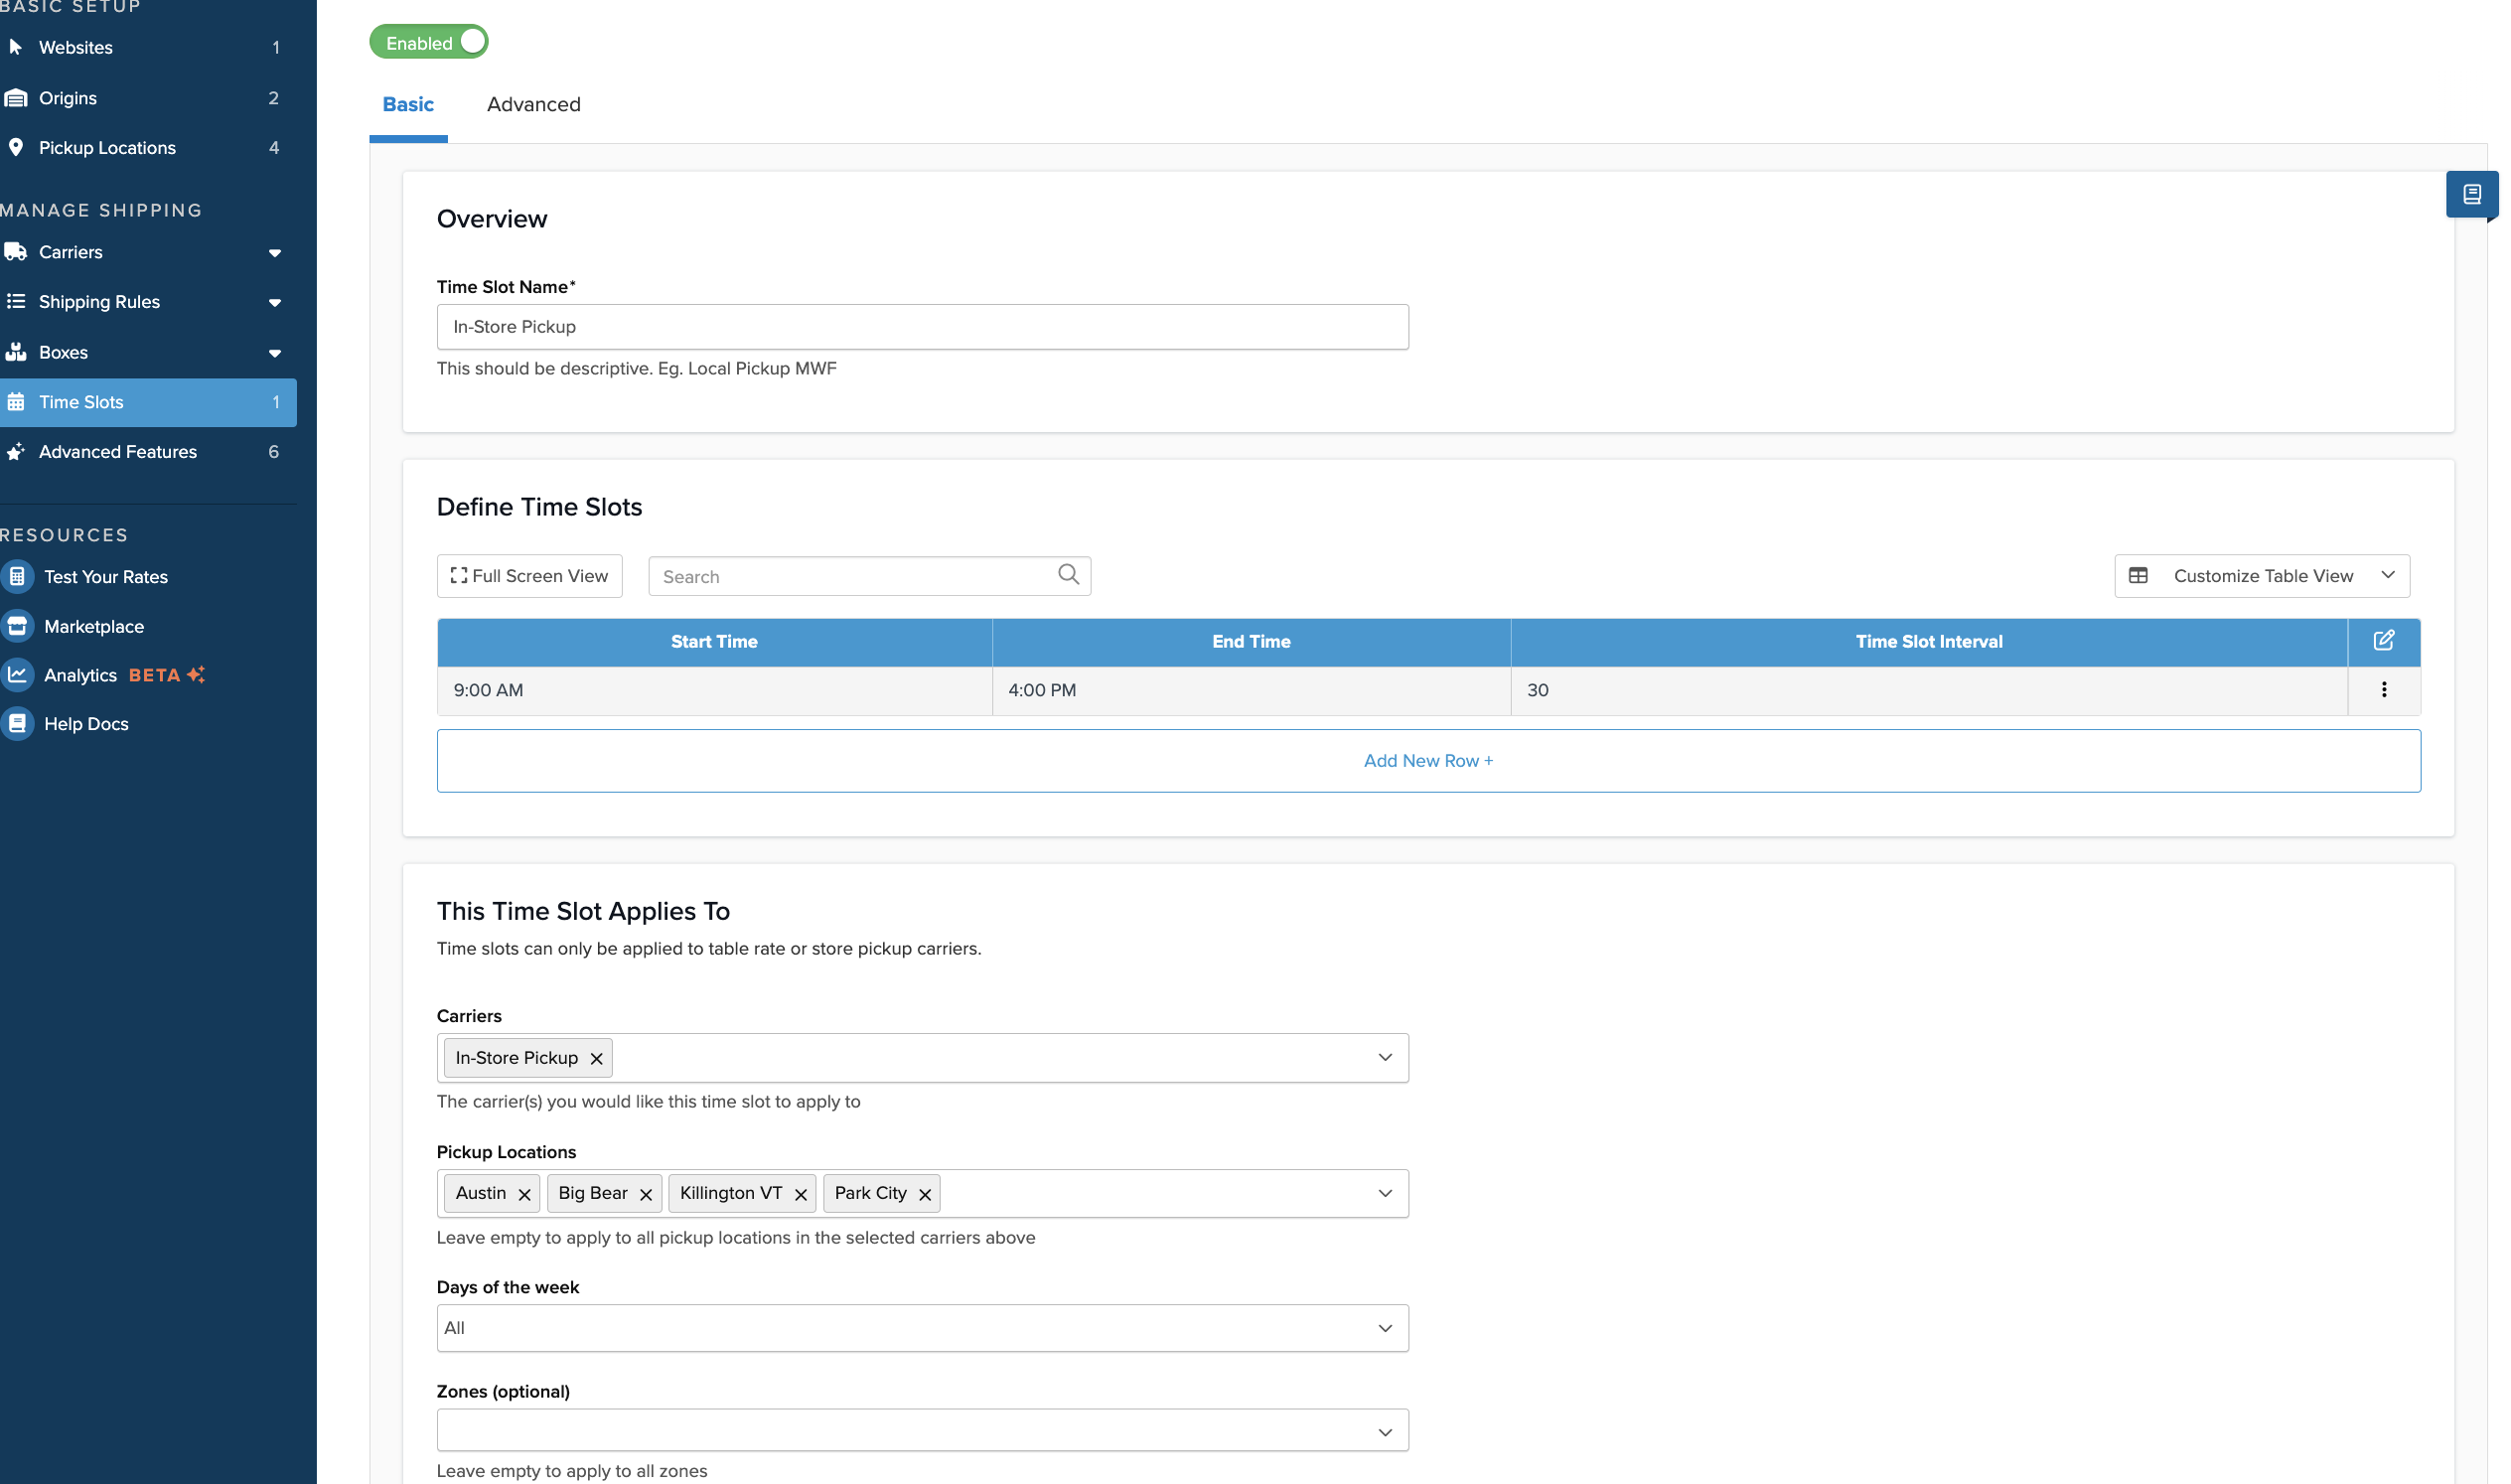
Customers can view available pickup time slots and a map of the pickup location at checkout.
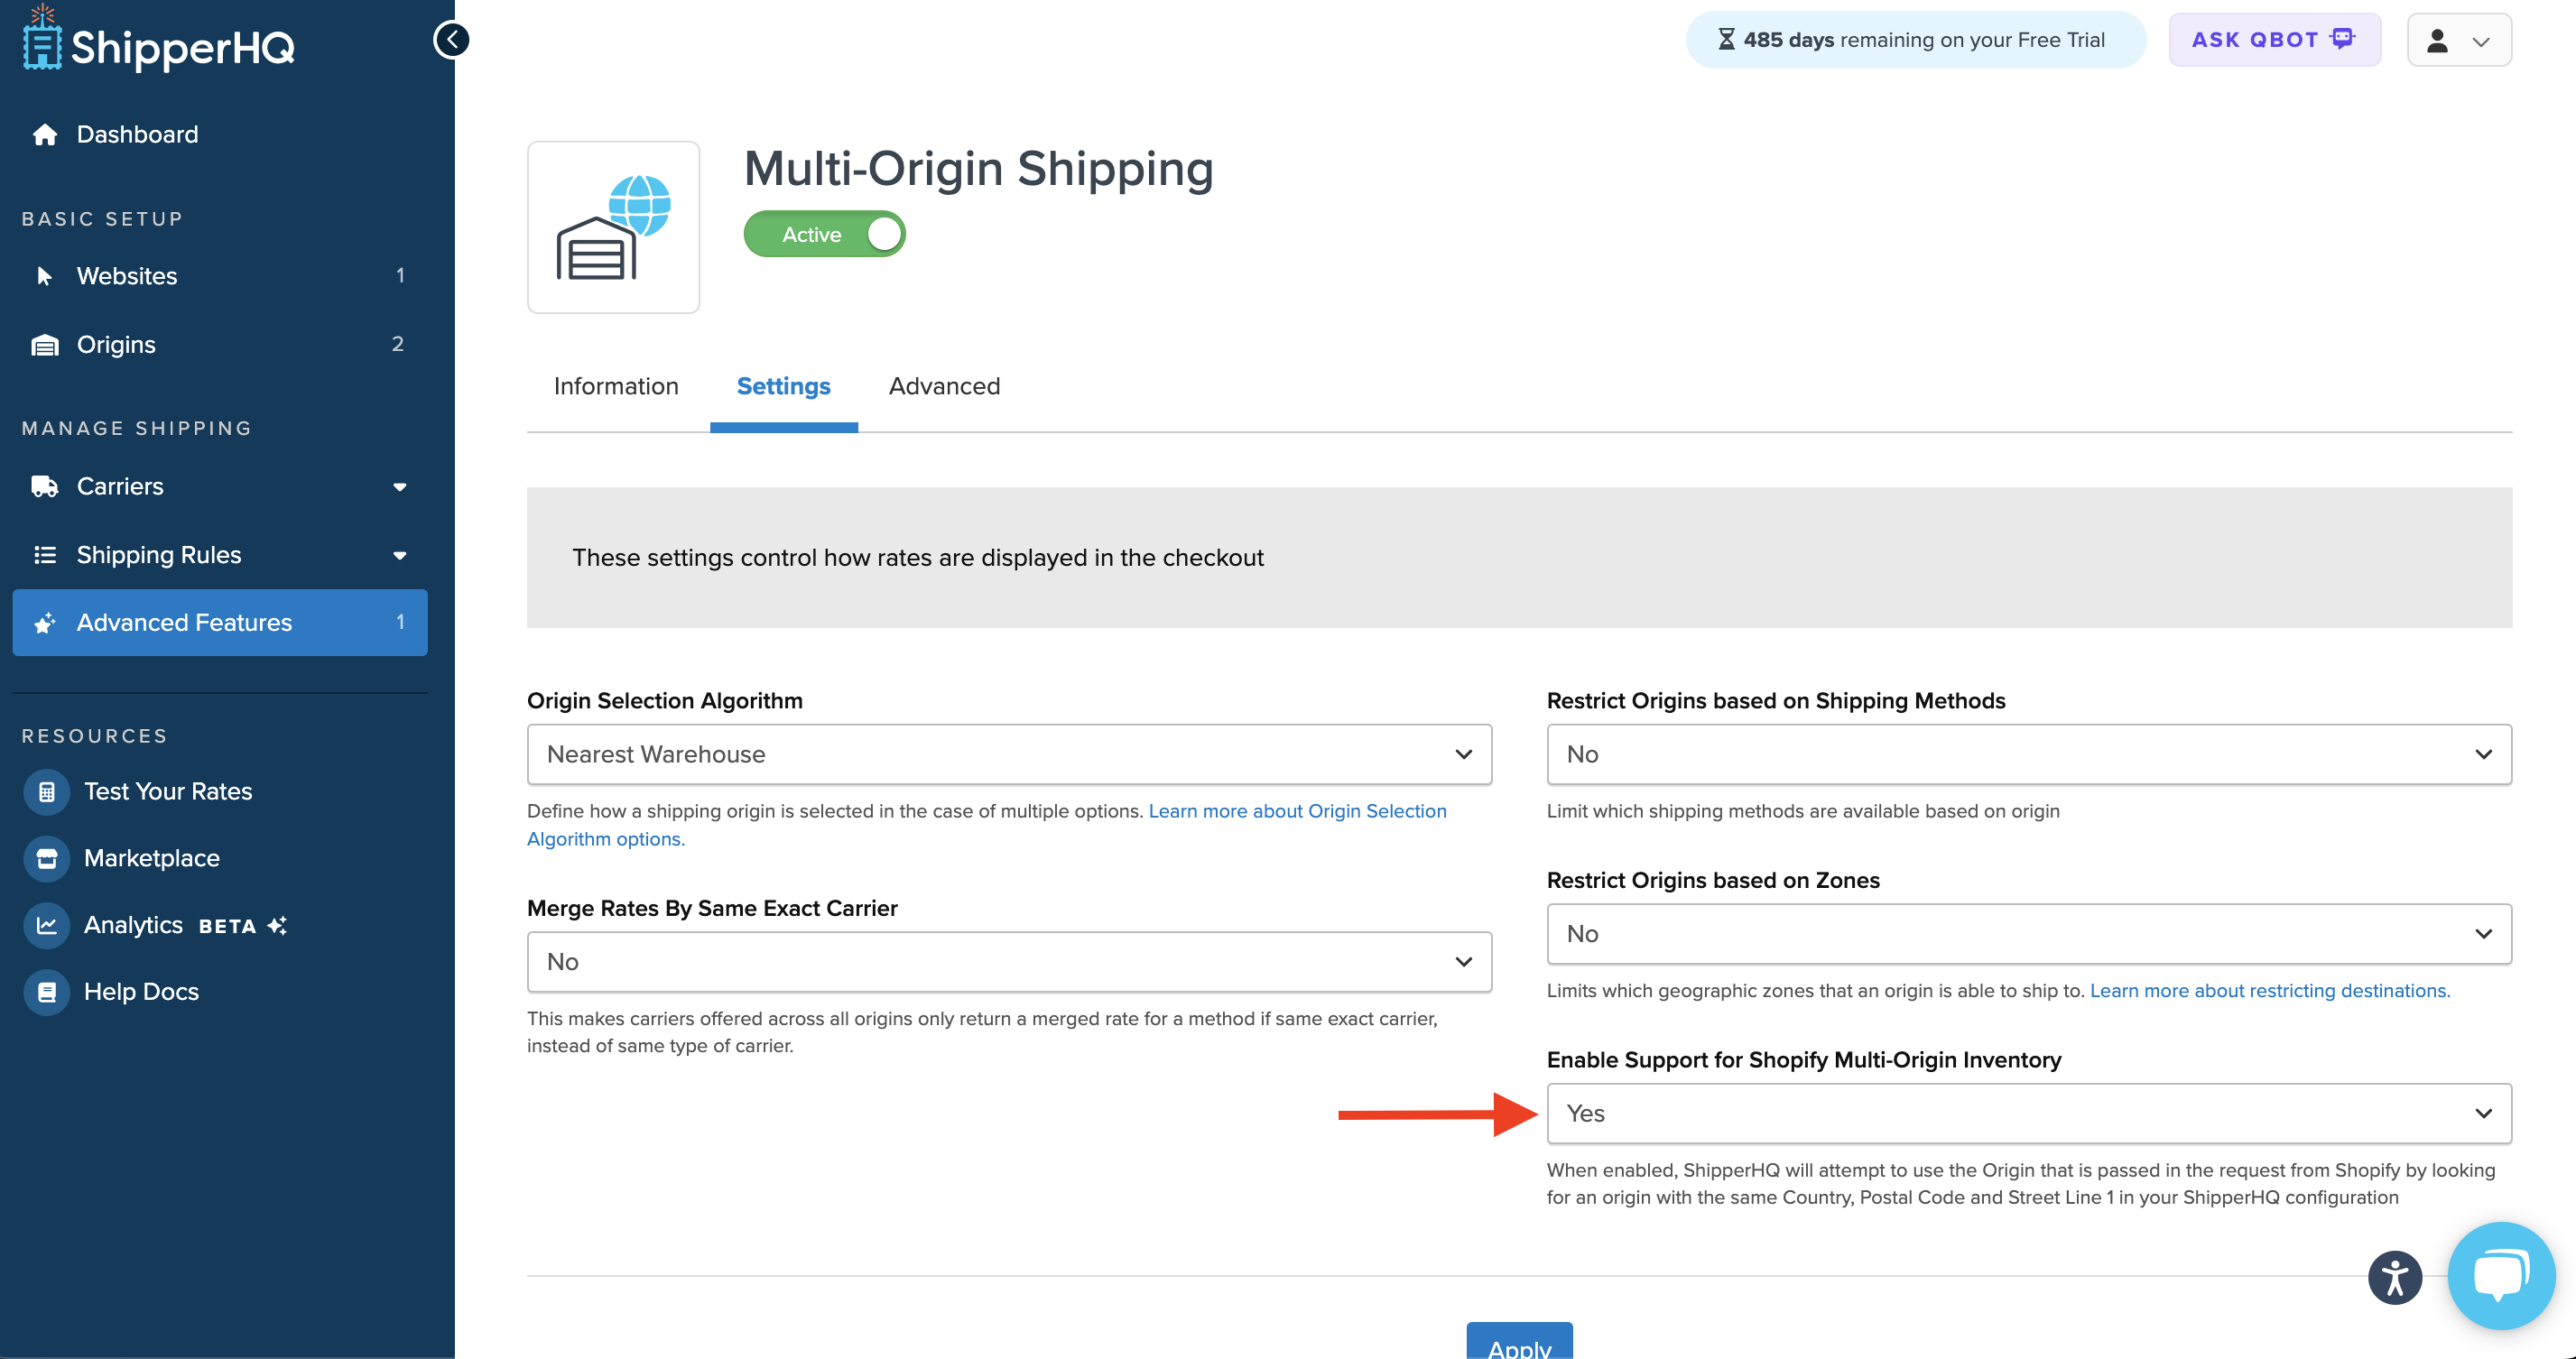
Enabling Support for Shopify Multi-Origin Inventory
To enable Shopify's Multi-origin inventory with Enhanced Checkout, toggle this feature under the Multi-Origin Advanced Feature > Settings Tab in your ShipperHQ dashboard.
Configure by setting the drop-down to "Yes," then click "Apply."
Split Shipping at Checkout
Setting up split shipping at checkout requires a few steps, with these advanced features enabled in ShipperHQ:
- Enhanced Checkout
- Shipping Insights
- Multi-Origin Shipping
Setup Steps
- Configure Origins in ShipperHQ as outlined in this article.
- Set your Shopify Plus dashboard locations in your Shopify settings.
- Go to Settings > Shipping & Delivery to adjust split shipping options in Shopify.
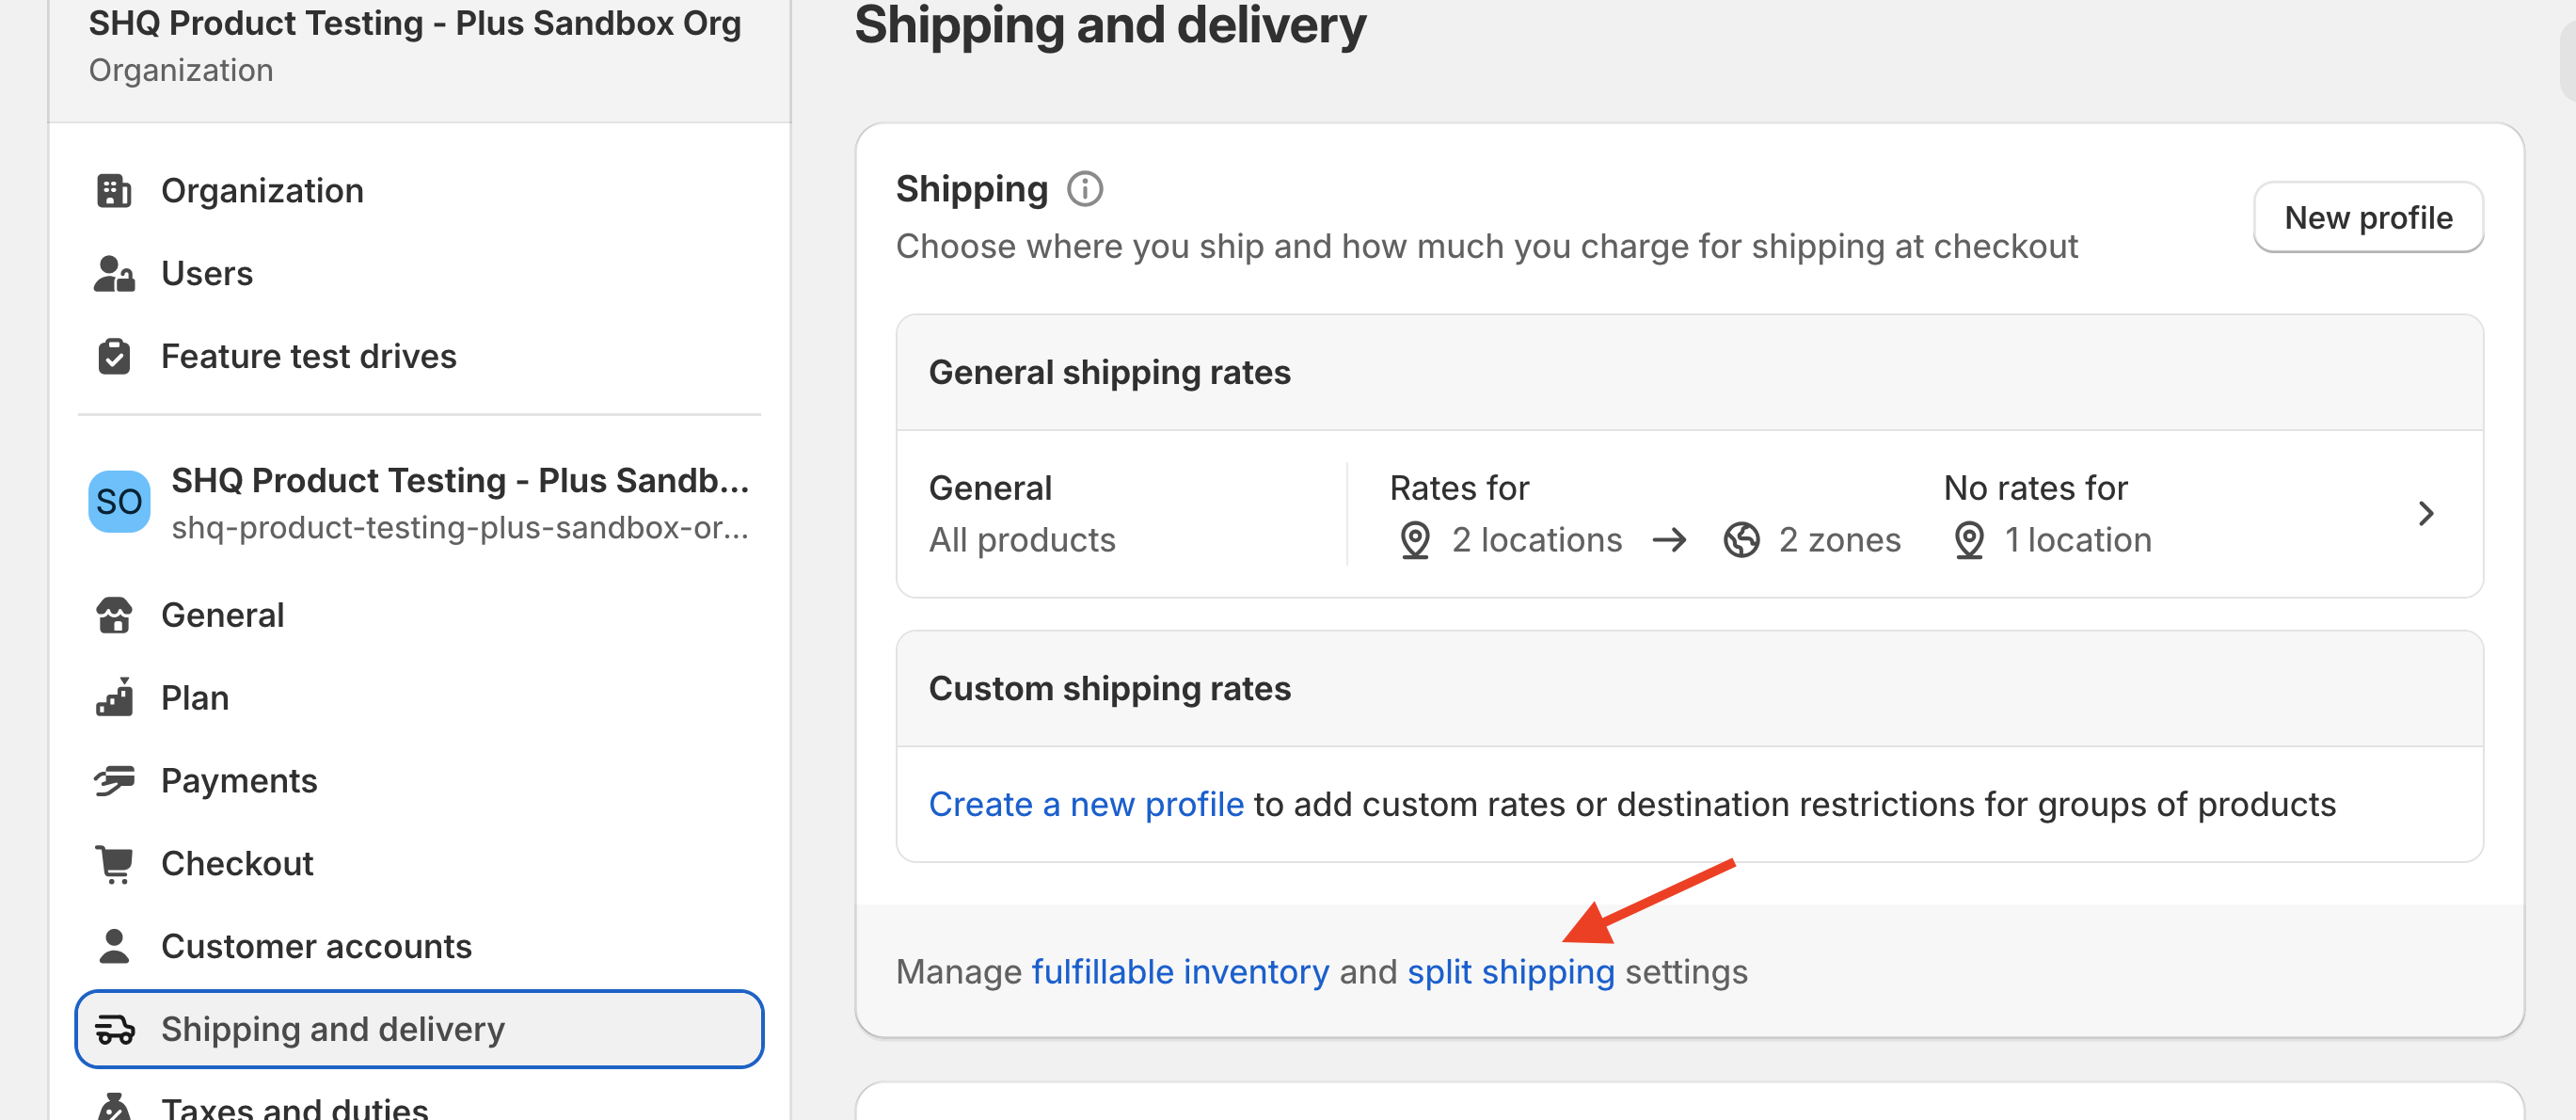

Check Shopify’s documentation for enabling Split Shipping. If unavailable, contact your Shopify Account Manager.
❗ Ensure matching addresses between ShipperHQ Origins and Shopify Locations for accurate application.
- Ensure the Enhanced Checkout Init app block is installed under Information and Enhanced Checkout v2 is set up.
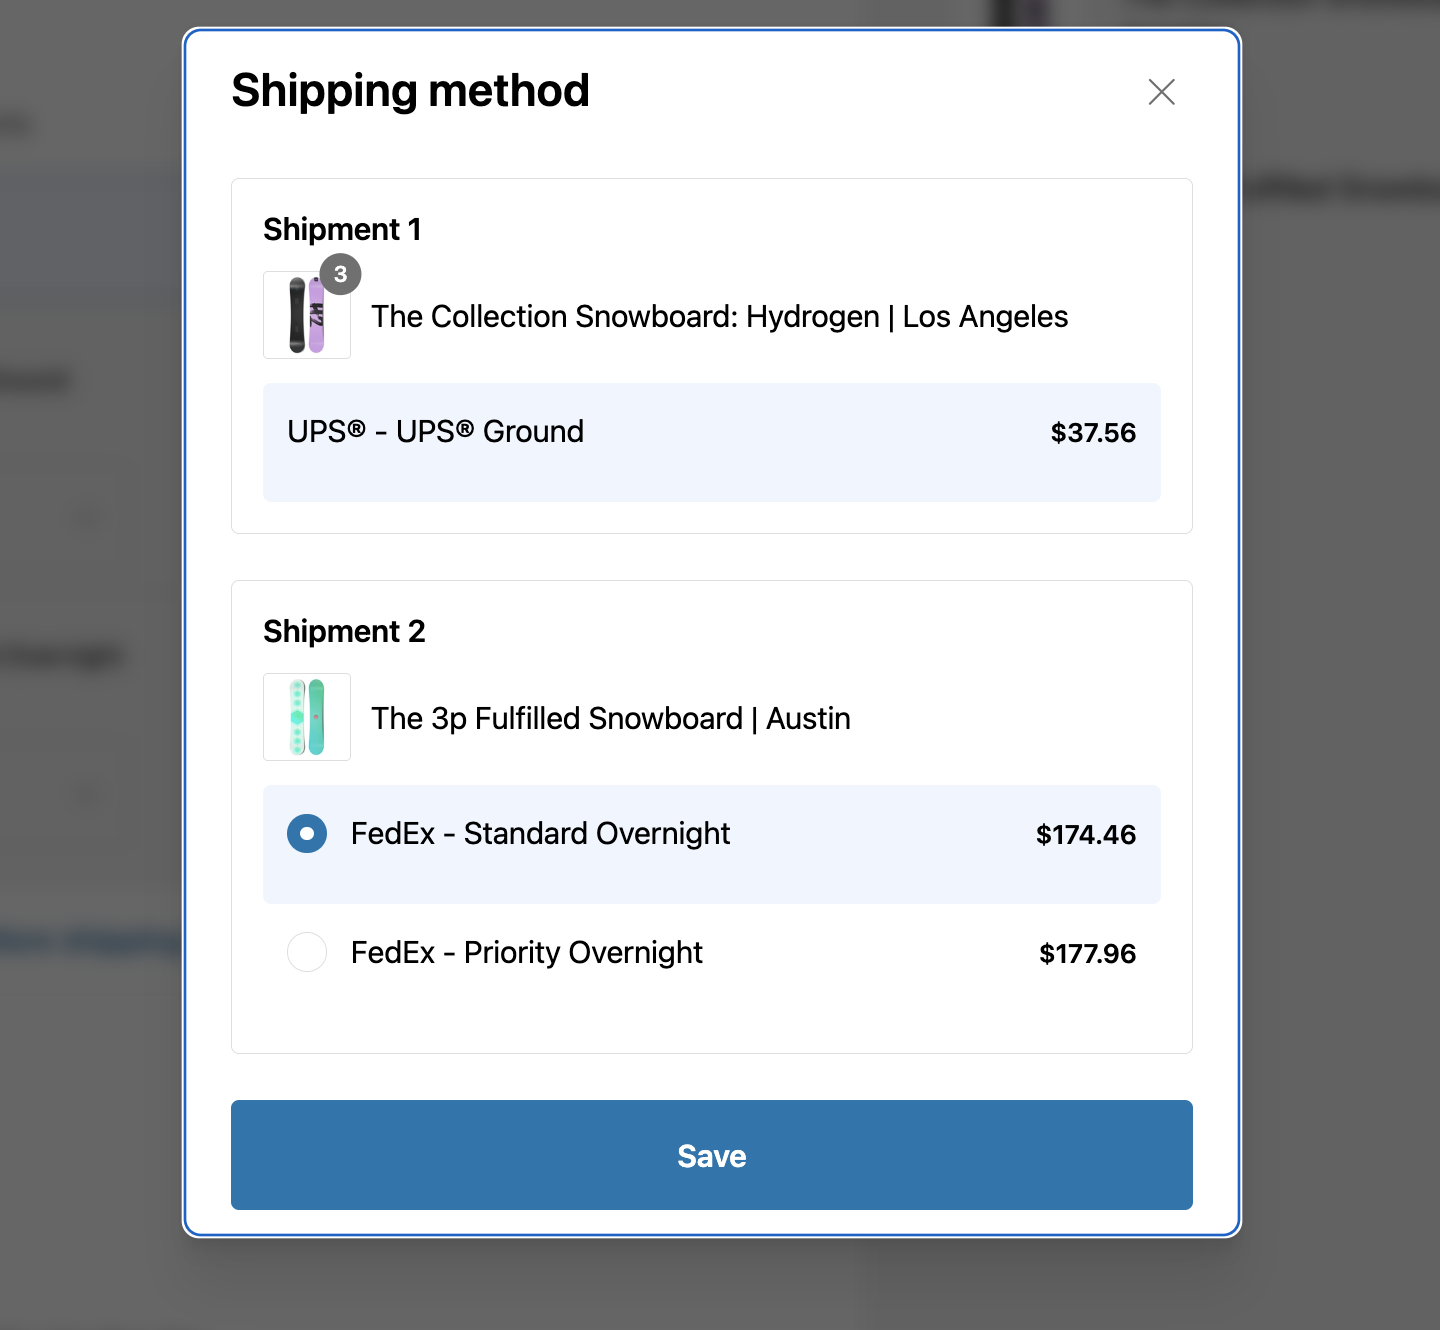
Once enabled, customers can view shipment details for orders shipping from multiple locations, with an overview and more detailed option available.
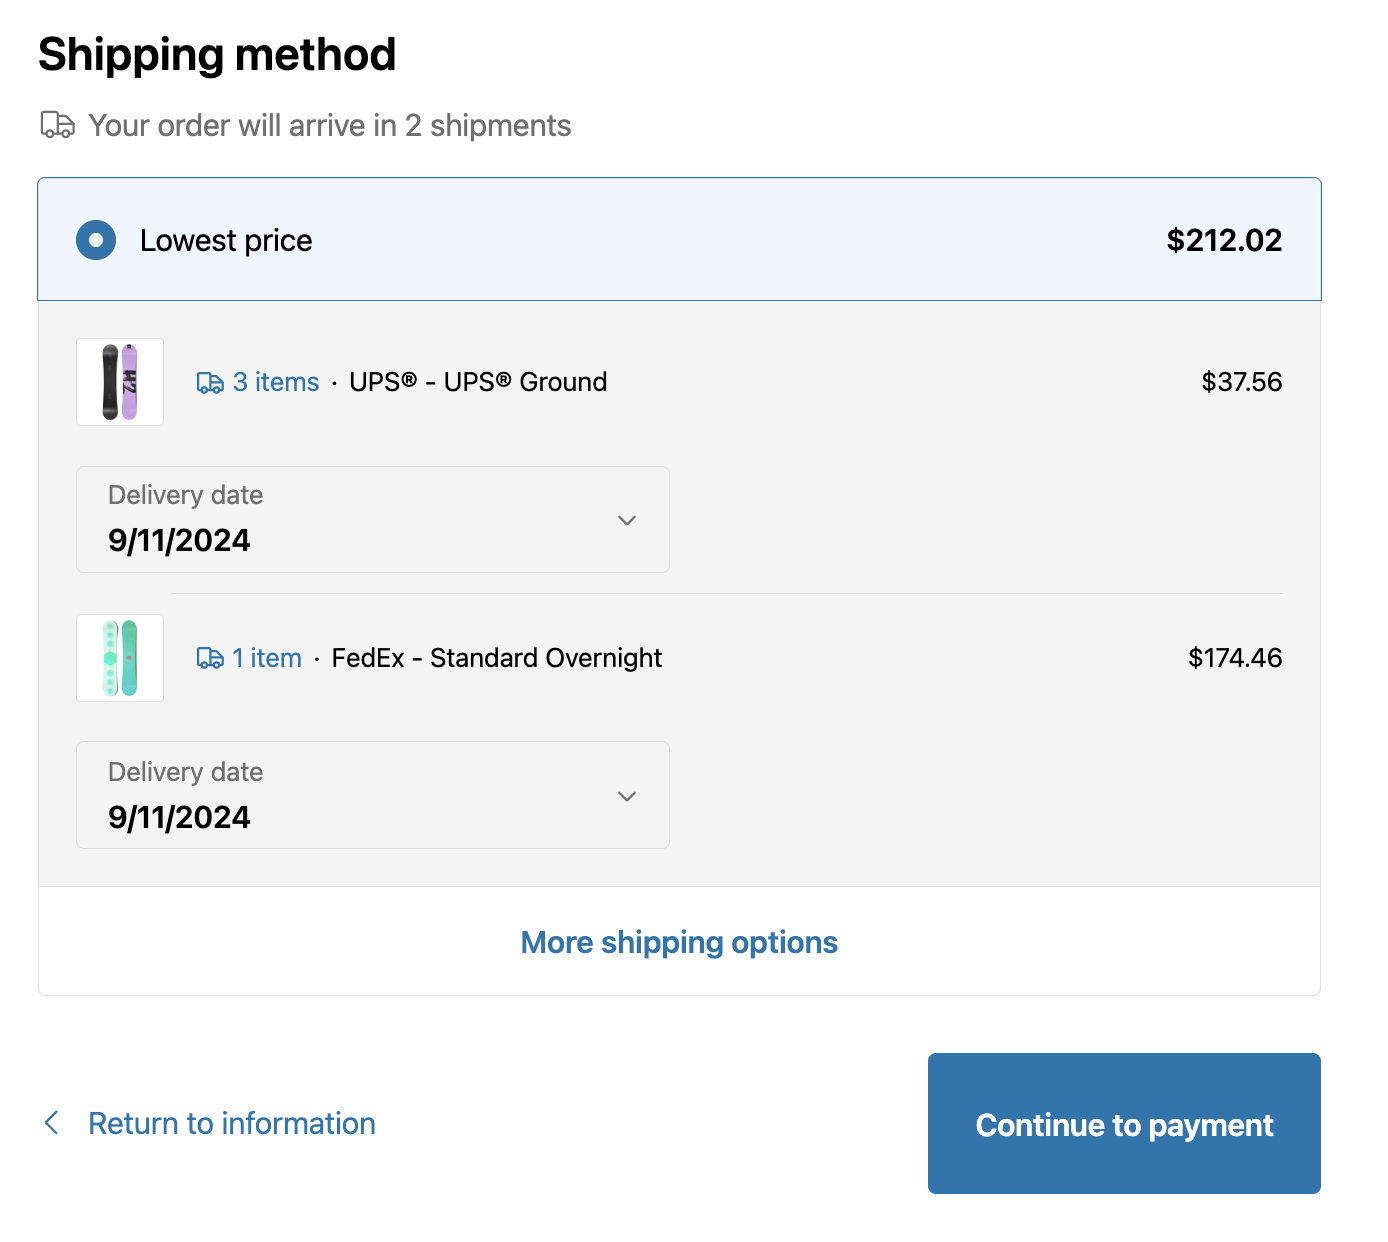
Enable more shipping options for customers to select different methods.
Shipping Insights Order Metafield
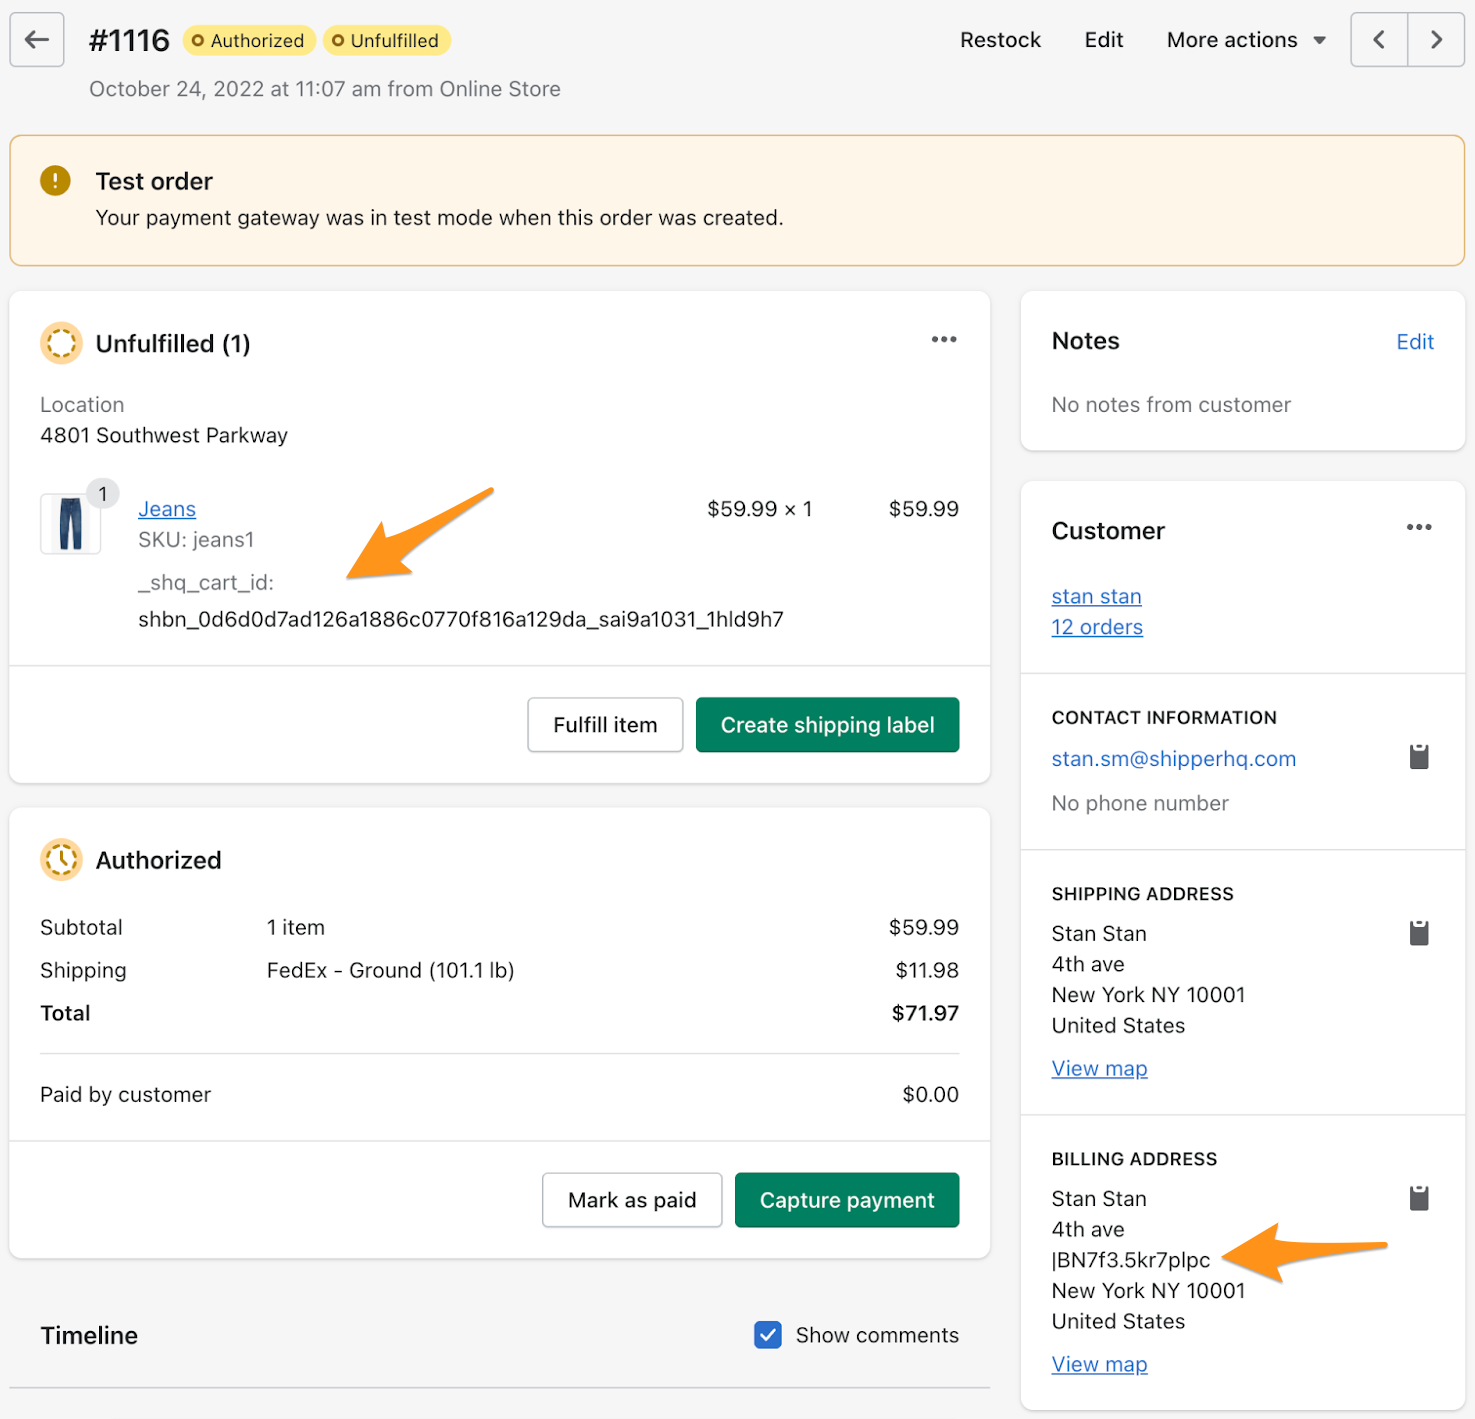
In addition to visual presentation, ShipperHQ Enhanced Checkout stores key details in a Shopify order metafield (shq.shippinginsights_) for orders with chosen delivery dates or store pickup. This data can be useful for ERP or fulfillment software integration.
The shq.shippinginsights_ metafield includes pickup locations for store pickup and dispatch/delivery dates when customers choose their delivery date.
shq.shippinginsights_ population requires:
- Enabled Shipping Insights in ShipperHQ
- Enhanced Checkout and Shipping Insights app blocks configured in Shopify at order placement
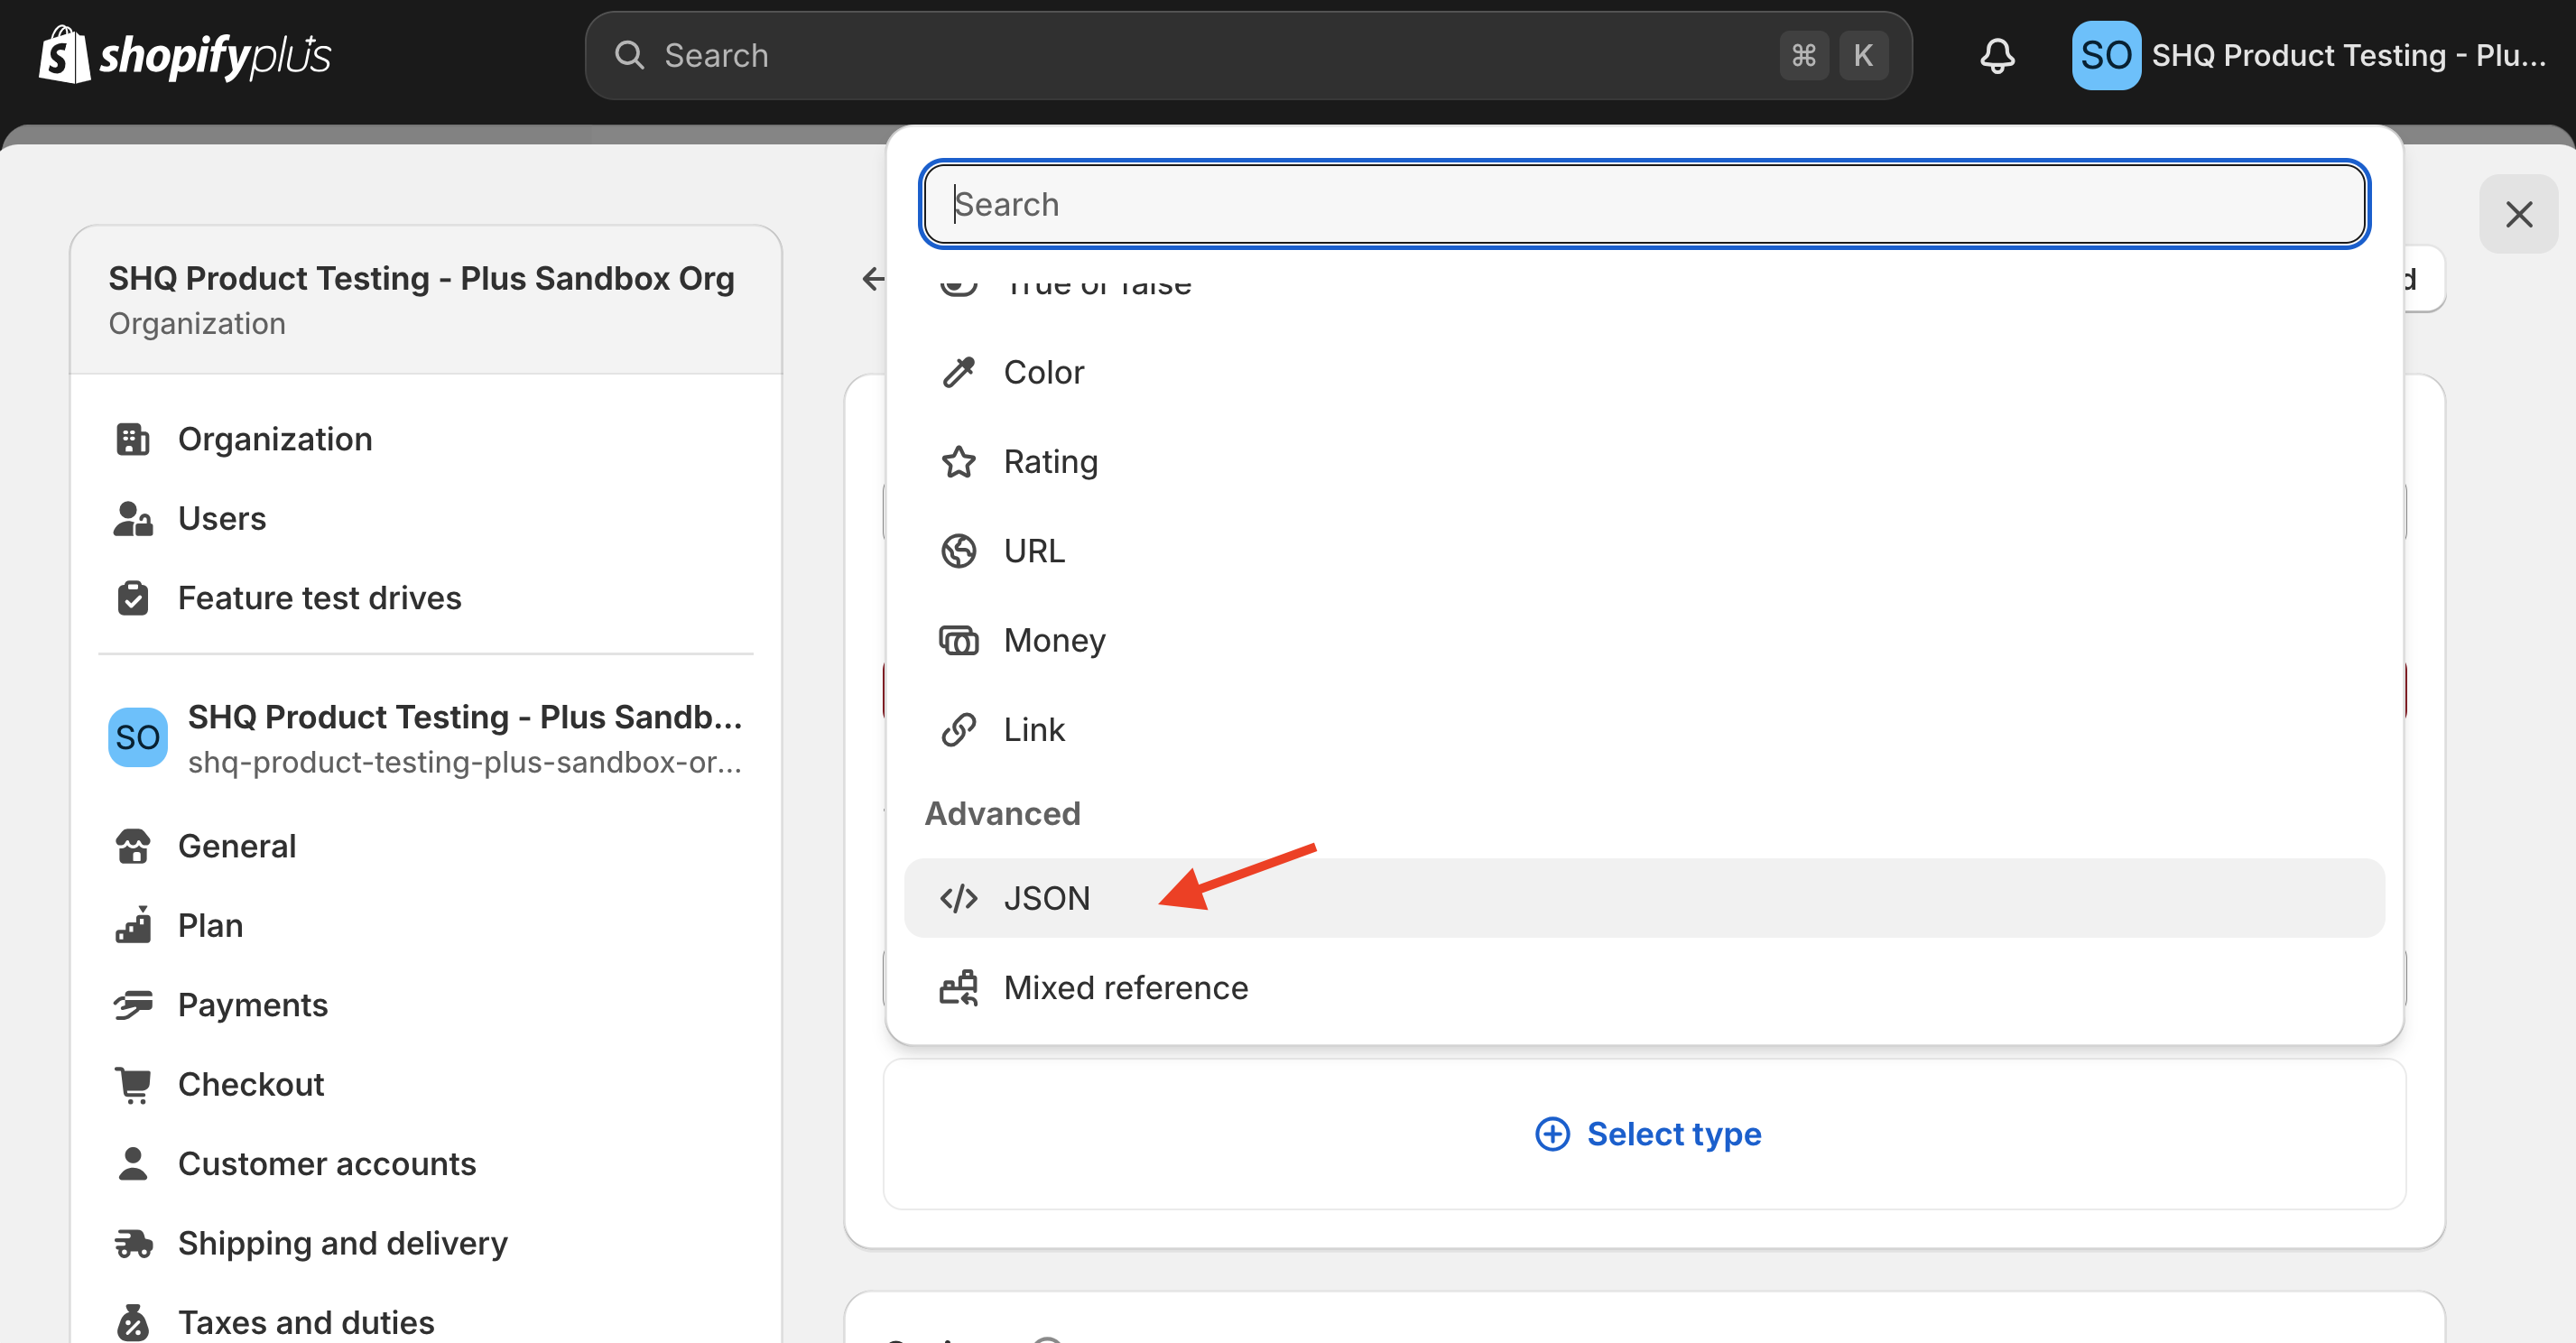
💡 To show data, create a Metafield Definition under Shopify's Settings > Custom Data > Orders. Click "View unstructured metafields" and "Add definition" next to shq.shippinginsights_. Set Type to JSON.
Additional Information
LTL Freight Accessorials
Enhanced Checkout on Shopify currently doesn't support displaying LTL Freight accessorial UI elements. Accessorials remain configurable in ShipperHQ. Interested? Contact us!
Unique SKUs Required
Unique SKUs are essential for accurate order detail collection in ShipperHQ. Duplicate SKUs may cause errors in shipping rate reporting.
Sales Taxes
Shopify no longer recalculates taxes dynamically during checkout due to deprecations. Customer tax figures do not adjust with shipping changes.
Line Item and Order Hidden Properties
Shopify caches shipping rates, and rate refetching isn't possible without cart edits. Hidden properties are used:
- Line items and Shipping/Billing Addresses contain automatically removed hidden properties post-order placement.
- Billing addresses remain uneditable, so properties stay.
Shopify Checkout Themes
ShipperHQ's Enhanced Checkout theme support is limited to general Shopify theme settings. For detailed customization instructions, log in to your Shopify store and adjust settings under Settings > Brand. 😊