
Overview
In this article, we'll describe how to set up FedEx® Hold at Location (HAL) in your ShipperHQ account. This delivery method offers added security and convenience, helping to boost conversion rates and customer loyalty. Learn how to gather necessary information, set up FedEx HAL in your ShipperHQ account, and manage the connection between ShipperHQ and FedEx efficiently.
Free ShipperHQ Subscriptions for FedEx Hold at Location: ShipperHQ offers free, limited functionality accounts supporting FedEx Hold at Location. For more details, visit How to Set Up Your Free ShipperHQ Account with FedEx® Hold at Location.
Other FedEx Services: ShipperHQ supports numerous FedEx services. You can find more information in our FedEx documentation.
Table of Contents
- Overview
- Requirements
- Register for a FedEx Online Account
- Generating Credentials
- Steps To Add This Carrier
- Steps to Validate This Carrier
- Steps After Carrier Configuration
- Troubleshooting
Requirements
To connect your FedEx Hold at Location Account to ShipperHQ, you’ll need specific credentials to allow ShipperHQ to connect with FedEx servers and obtain rate quotes. Here’s what you’ll need:
- A registered account with FedEx
- Your FedEx Account Number
- The address and phone number associated with your FedEx Account Billing
💡 Note: FedEx Hold at Location only supports domestic US shipments.
⚠️ Important: Alert your customers that they have 5 business days to pick up their package at a FedEx Hold at Location retailer. ShipperHQ's FedEx Hold at Location functionality does not automatically send alerts.
Register for a FedEx Online Account
If you already have a FedEx Online account connected to a FedEx Account, proceed to the Generating Credentials section. Otherwise, follow these steps to get set up:
- If you don’t have a FedEx Hold At Location Account and Account Number, contact FedEx to set up an account and get your Account Number.
- If you don’t have a FedEx Online account, go to FedEx.com, click Sign Up in the top right corner, and create one.
- If you haven't connected your FedEx Online account to your FedEx Account, log in at FedEx.com, click your username, choose "My Profile," then "Account Management." Check if your accounts are linked, or add an account if needed.
Generating Credentials
Next, generate specific credentials to connect your FedEx Account to ShipperHQ via the FedEx Web Services Developer Center.
💡 Note: Even if you have existing FedEx Web Services credentials, it is recommended to create a new set for ShipperHQ to ensure your existing connections remain unaffected.
- Visit the Register for Production Keys form and log in with your FedEx Online credentials.
- Set Do You Intend to Resell Your Software? to "No".
- Check "FedEx Web Services for Shipping".
- Choose "Corporate Developer" for the indicated question.
- Click Continue.
- Accept the User Agreement.
- Enter your FedEx Account Number, verify contact information, and click Continue.
- Choose not to update your profile, then click Continue.
- Save your Authentication Key and Meter Number from the Confirmation page.
- Look for the email with your password, titled "Your developer Production Key Registration is complete." This password is different from your FedEx Online login password.
With your credentials ready, continue to Connecting ShipperHQ to Your FedEx Account.
Steps To Add This Carrier
- Navigate to the carriers page in the ShipperHQ dashboard.
- Click +New to add a new carrier.
- Select Live Rate Carrier.
- Search and select FedEx Hold at Location.
- Name this carrier (this name will appear to customers at checkout).
- ✅ Success! Your FedEx carrier is now added to your carriers list in ShipperHQ.
- Proceed to Validate your FedEx HAL Carrier, or skip this step and configure your carrier settings right away.
Steps to Validate This Carrier
To access live rates, enter your credentials for FedEx and have them validated.
- Select Enter Credentials & Validate.
- Review required information and Continue.
- For SmartPost, provide your Hub ID.
- Refer to the Generating Credentials section for required details.
- Enter your credentials and click Validate.
⚠️ Note: Accurate credentials are crucial for successful validation and receiving live rates.
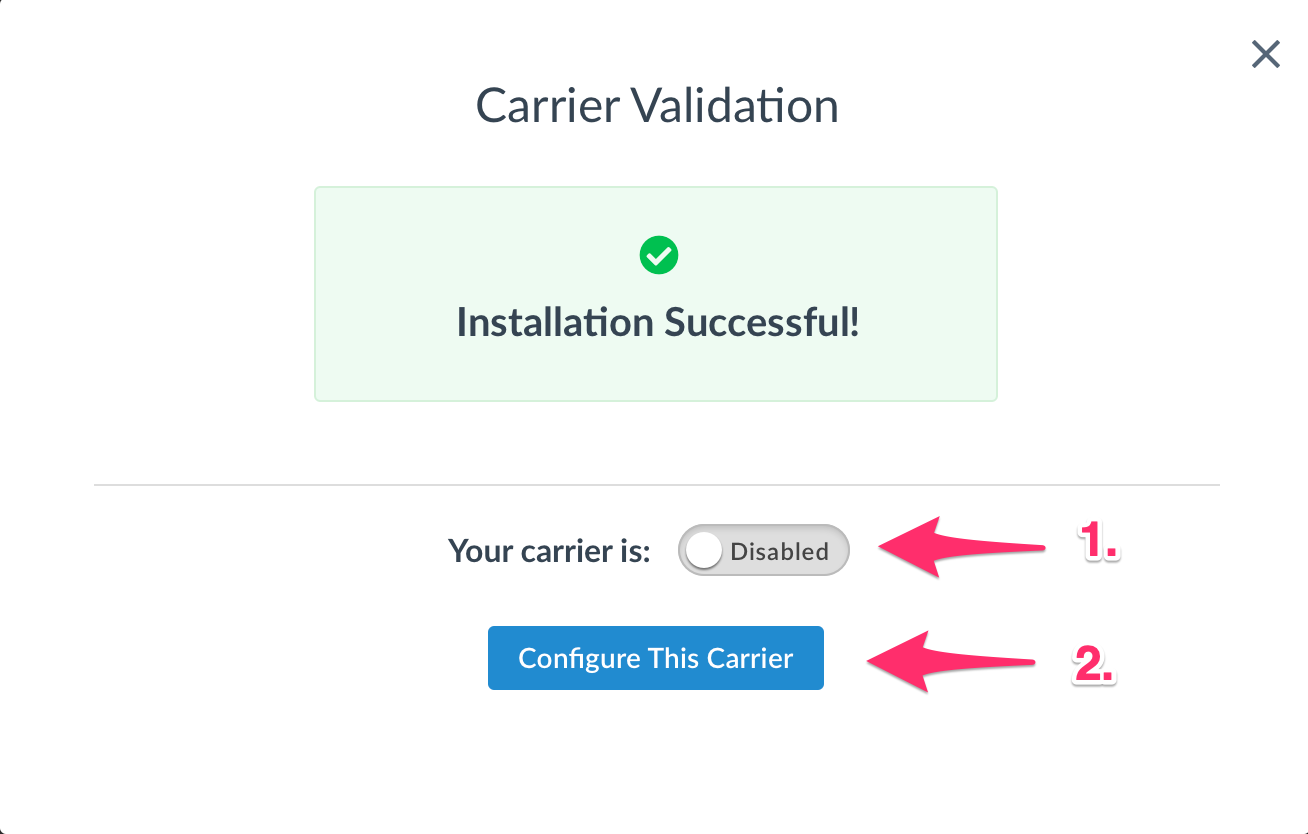
- If validation is successful:
- Enable your carrier immediately if desired.
- Choose Configure This Carrier to adjust settings. You can also enable it after saving settings.
- If validation fails:
- Credentials entered will be saved for future attempts.
- Try validation again or choose to skip and validate later.
- Contact ShipperHQ support for assistance.
Steps After Carrier Configuration
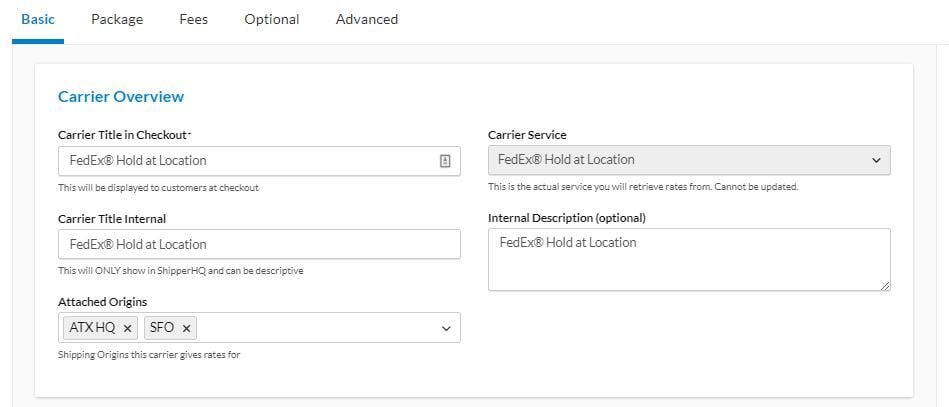
After configuring FedEx® Hold At Location, customize options to suit your customers' needs. These options are on the carrier's Basic tab.
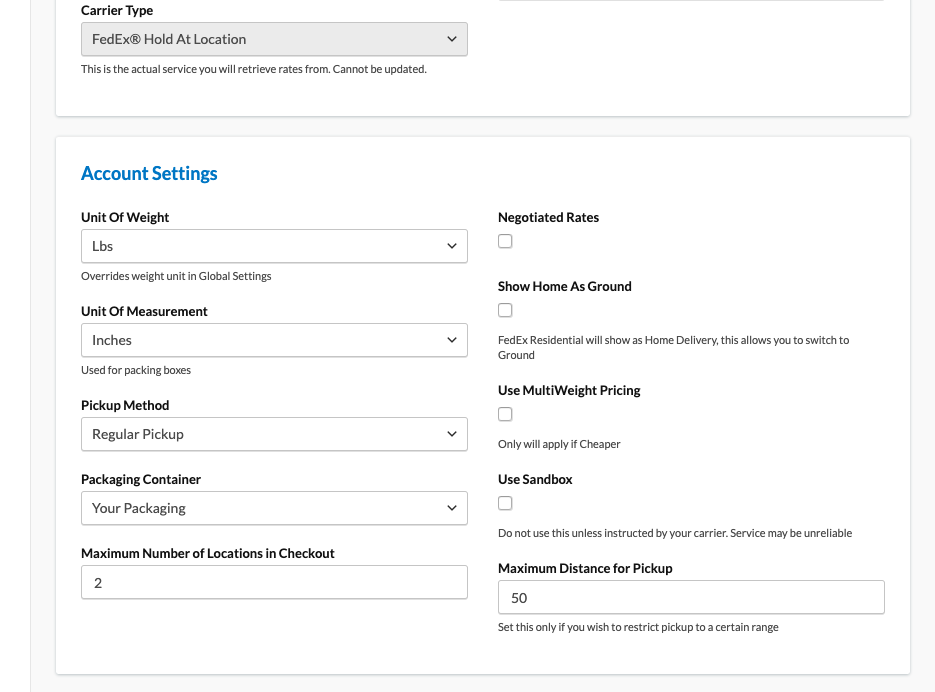
Setting Maximum Number of Locations
- Located in Account Settings, set the maximum number of locations shown during checkout.
- We recommend limiting to a maximum of 5 unless otherwise suited to customer needs.
Setting Maximum Distance for Pickup
- Found in Account Settings, configure the range for pickup distance shown during checkout.
💡 Considerations for settings:
- Tailor options to your customer base's location. Urban or rural settings might impact your maximum distance choice.
- Multiple shipping methods will display multiple options. For example, with 3 shipping methods and 2 locations set, customers will see 6 options.
Troubleshooting
ShipperHQ works with FedEx credentials to ensure shipping rates match those from FedEx ShipManager or FedEx.com. If rates differ, check our troubleshooting steps.
If issues persist, contact FedEx Web Services Support at websupport@fedex.com.
ShipperHQ passes shipping information collected at checkout back to your ecommerce platform for further processing.
For more FedEx Hold at Location details, visit FedEx's dedicated page.